8 Linking and loading on bare metal
Relocation is the process of replacing symbol references with their actual symbol definitions in an object file. A symbol reference is the memory address of a symbol.
If the definition is hard to understand, consider a similar analogy: house relocation. Suppose that a programmer bought a new house and the new house is empty. He must buy furniture and appliances to fulfill daily needs and thus, he makes a list of items to buy, and where to place them. To visualize the placement of the new items, he draws a blueprint of the house and the respective places of all items. He then travels to the shops to buy goods. Whenever he visits a shop and sees matching items, he tells the shop owner to note them down. After he is done selecting, he tells the shop owner to pick up a brand new item instead of the objects on display, then gives the address for delivering the goods to his new house. Finally, when the goods arrive, he places the items where he planned at the beginning.
Now that house relocation is clear, object relocation is similar:
The list of items represents the relocation table, where the memory location for each symbol (item) is predetermined.
Each item represents a pair of symbol definition and its symbol address.
Each shop represents a compiled object file.
Each item on display represents a symbol definition and references in the object file.
The new address, where all the goods are delivered, represents the final executable binary or the final object file. Since the items on display are not for sale, the shop owner delivers brand new goods instead. Similarly, the object files are not merged together, but copied all over to a new file, the object/executable file.
Finally, the goods are placed in the positions according to the shopping list made at the beginning. Similarly, the symbol definitions are placed appropriately in their respective sections and the symbol references of the final object/executable file are replaced with the actual memory addresses of the symbol definitions.
Running this chapter’s code
The first half of this chapter inspects hosted programs with
readelf, objdump and ld, with
files you write in any directory of the container, as in Part I. The
second half turns the project of chapter 7 into the one in
code/chapter8/os of the repository: the bootloader
assembled to ELF for debugging, a kernel written in C and linked with
our own linker script, and a bootloader that reads the entry point from
the ELF header. From the top of the repository:
$ docker run --rm --user "$(id -u):$(id -g)" --security-opt seccomp=unconfined -v "$PWD":/work -w /work/code/chapter8/os os01 makebuilds build/disk.img: the bootloader in the first
sector, then the kernel build/os/os, an ELF file written
whole from the second sector on. The bootloader reads the first 17 of
those sectors, which is enough for the part of the file that must be in
memory. With make test in place of make,
tools/boot-test.sh boots the image headlessly and checks
that the CPU reaches 0x600, the address of
main in the kernel; it prints
boot-test: ok, stopped at 0x600. For an interactive
session, make qemu in one shell of the container and
make gdb in another, both in code/chapter8/os:
the .gdbinit of the directory connects to QEMU, loads the
symbols of build/os/os and stops at 0x7c00,
then at main, with the source of main.c on
screen. The symbols of the bootloader itself are in
build/bootloader/bootloader.o.elf, as explained in section
Debuggable bootloader on bare metal. make clean removes
build/.
8.1 Understand relocations with readelf
In chapter 5, The Anatomy of a Program, when we explored object
sections, there existed sections that begin with .rel.
These sections are relocation tables that map between a symbol and its
location in the final object file or the final executable binary1.
Suppose that a function foo is defined in another object
file, so main.c declares it as extern:
main.c
int i;
void foo();
int main(int argc, char *argv[])
{
    i = 5;
    foo();
    return 0;
}

void foo() {}
When we compile main.c as an object file with this
command:
$ gcc $BOOKFLAGS -c main.cThen, we can inspect the relocation tables with this command:
$ readelf -r main.oThe output:
Relocation section '.rel.text' at offset 0xdc contains 2 entries:
 Offset     Info    Type            Sym.Value  Sym. Name
00000008  00000201 R_386_32          00000000   i
00000011  00000402 R_386_PC32        0000001c   foo
The first edition of this book, compiled without
-fno-asynchronous-unwind-tables, showed a second table,
.rel.eh_frame, with two more entries. The flag removes the
.eh_frame section (see chapter 0), and with it the
relocations that pointed into it.
8.1.1 Offset
An offset is the location into a section of a binary file,
where the actual memory address of a symbol definition is replaced. The
section with .rel prefix determines which section to offset
into. For example, .rel.text is the relocation
table of symbols whose address needs correcting in the
.text section, at a specific offset into the
.text section. In the example output:
00000011 00000402 R_386_PC32 0000001c fooThe first number indicates there exists a reference to symbol
foo that is 11 bytes into the
.text section. To see it clearer, we recompile
main.c with the option -g into the file
main_debug.o, then run objdump on it:
$ gcc $BOOKFLAGS -g -c main.c -o main_debug.o
$ objdump -M intel -d -S main_debug.o

Disassembly of section .text:

00000000 <main>:
int i;
void foo();
int main(int argc, char *argv[])
{
   0:   55                      push   ebp
   1:   89 e5                   mov    ebp,esp
   3:   83 e4 f0                and    esp,0xfffffff0
    i = 5;
   6:   c7 05 00 00 00 00 05    mov    DWORD PTR ds:0x0,0x5
   d:   00 00 00
    foo();
  10:   e8 fc ff ff ff          call   11 <main+0x11>
    return 0;
  15:   b8 00 00 00 00          mov    eax,0x0
}
  1a:   c9                      leave
  1b:   c3                      ret

0000001c <foo>:

void foo() {}
  1c:   55                      push   ebp
  1d:   89 e5                   mov    ebp,esp
  1f:   90                      nop
  20:   5d                      pop    ebp
  21:   c3                      ret
The byte at 10 is the opcode e8, the
call instruction; the byte at 11 is the value
fc. Why is the operand value for e8
0xfffffffc, which is equivalent to -4, but the translated
instruction is call 11? It will be explained after a few
more sections, but you should pause and think a bit about the reason
why.
The other entry, at offset 8, is the address of
i inside the mov DWORD PTR ds:0x0,0x5
instruction: the four zero bytes at 8 to b are
the placeholder that the linker fills in.
8.1.2 Info
Info specifies the index of a symbol in the symbol table and the type of relocation to perform.
00000011 00000402 R_386_PC32 0000001c fooThe first two bytes, 0004, are the index of symbol
foo in the symbol table, and the last byte,
02, is the relocation type. The numbers are written in hex
format. In the example, symbol foo is indeed at index
4:
$ readelf -s main.o

Symbol table '.symtab' contains 5 entries:
   Num:    Value  Size Type    Bind   Vis      Ndx Name
     0: 00000000     0 NOTYPE  LOCAL  DEFAULT  UND
     1: 00000000     0 FILE    LOCAL  DEFAULT  ABS main.c
     2: 00000000     4 OBJECT  GLOBAL DEFAULT    4 i
     3: 00000000    28 FUNC    GLOBAL DEFAULT    1 main
     4: 0000001c     6 FUNC    GLOBAL DEFAULT    1 foo
8.1.3 Type
Type represents the type value in textual form. Looking at the type
of foo:
00000011 00000402 R_386_PC32 0000001c foo02 is the type in its numeric form, and
R_386_PC32 is the name assigned to that value. Each value
represents a relocation method of calculation. For example, with the
type R_386_PC32, the following formula is applied for
relocation (Intel i386 psABI):
To understand the formula, it is necessary to understand symbol values.
8.1.4 Sym.Value
This field shows the symbol value. A symbol value is a value
assigned to a symbol, whose meaning depends on the Ndx
field:
A symbol whose section index is COMMON:
its symbol value holds alignment constraints.
Example 8.1. Older versions of gcc put every
uninitialized global variable, such as i, in the special
COMMON section. Since gcc 10, the default is
-fno-common and such variables are allocated in
.bss like any other; this is what the symbol table above
shows, where i belongs to section 4, which is
.bss. The old behavior can be requested with
-fcommon:
$ gcc $BOOKFLAGS -fcommon -c main.c -o main_common.o
$ readelf -s main_common.o

Symbol table '.symtab' contains 5 entries:
   Num:    Value  Size Type    Bind   Vis      Ndx Name
     0: 00000000     0 NOTYPE  LOCAL  DEFAULT  UND
     1: 00000000     0 FILE    LOCAL  DEFAULT  ABS main.c
     2: 00000004     4 OBJECT  GLOBAL DEFAULT  COM i
     3: 00000000    28 FUNC    GLOBAL DEFAULT    1 main
     4: 0000001c     6 FUNC    GLOBAL DEFAULT    1 foo
In this variant, the variable i is identified as
COM (uninitialized variable)2,
and its symbol value is a memory alignment for assigning a proper memory
address that conforms to the alignment in the final memory address. In
the case of i, the value is 4, so the starting
memory address of i in the final binary file will be a
multiple of 4. The linker merges all the COMMON symbols of
the same name from different object files into one, which is why such
variables may be declared in several files without an
extern keyword; this leniency is the reason the default was
changed.
A symbol whose Ndx identifies a specific
section: its symbol value holds a section offset.
Example 8.2. In the symbol table, main
and foo belong to section 1:
3: 00000000    28 FUNC    GLOBAL DEFAULT    1 main
4: 0000001c 6 FUNC GLOBAL DEFAULT 1 fooThere are 10 section headers, starting at offset 0x138:
Section Headers:
[Nr] Name Type Addr Off Size ES Flg Lk Inf Al
[ 0] NULL 00000000 000000 000000 00 0 0 0
[ 1] .text PROGBITS 00000000 000034 000022 00 AX 0 0 1
[ 2] .rel.text REL 00000000 0000dc 000010 08 I 7 1 4
[ 3] .data PROGBITS 00000000 000056 000000 00 WA 0 0 1
[ 4] .bss NOBITS 00000000 000058 000004 00 WA 0 0 4
[ 5] .comment PROGBITS 00000000 000058 000020 01 MS 0 0 1
..... remaining output omitted for clarity....main starts at offset 0 of
.text and foo at offset 0x1c,
which matches the objdump listing above.
In the final executable and shared object files: instead of the above values, a symbol value holds a memory address.
Example 8.3. After compiling main.c
into the final executable main, the symbol table now
contains the memory address for each symbol5:
Symbol table '.symtab' contains 38 entries:
   Num:    Value  Size Type    Bind   Vis      Ndx Name
     0: 00000000     0 NOTYPE  LOCAL  DEFAULT  UND
     1: 00000000     0 FILE    LOCAL  DEFAULT  ABS crt1.o
     2: 0804906d     0 NOTYPE  LOCAL  DEFAULT   12 __wrap_main
     3: 0804a0ac    32 OBJECT  LOCAL  DEFAULT   17 __abi_tag
....output omitted...
    28: 08049172     6 FUNC    GLOBAL DEFAULT   12 foo
    29: 0804c014     0 NOTYPE  GLOBAL DEFAULT   24 _end
    31: 08049040    50 FUNC    GLOBAL DEFAULT   12 _start
    33: 0804c010     4 OBJECT  GLOBAL DEFAULT   24 i
    34: 0804c00c     0 NOTYPE  GLOBAL DEFAULT   24 __bss_start
    35: 08049156    28 FUNC    GLOBAL DEFAULT   12 main
...output omitted...
Unlike the values of the symbols foo, i and
main in the main.o object file, the complete
memory addresses are in place.
Now it suffices to understand relocation types. Previously, we
mentioned the type R_386_PC32. The following formula is
applied for relocation (Intel i386 psABI):
where:
represents the value of the symbol. In the final executable binary, it is the address of the symbol.
represents the addend, an extra value added to the value of a symbol.
represents the memory address to be fixed6.
is the distance between a relocating location and the actual memory location of a symbol definition, or a memory address.
But why do we waste time calculating a distance instead of replacing
with a direct memory address? The reason is that the call
and jmp instructions of the x86 architecture do not take an
absolute memory address as an operand: their operand is a displacement
relative to the next instruction, as listed in table 4.2 of chapter 4,
x86 Assembly and C. In assembly language, an absolute address can be
written simply because it is syntactic sugar that is later transformed
into the relative form by the assembler. Data accesses, on the other
hand, can use an absolute address: that is what the
R_386_32 relocation of i does, and its formula
is simply
.
Example 8.4. For the foo symbol:
00000011 00000402 R_386_PC32 0000001c fooThe distance between the usage of foo in
main.o and its definition, applying the formula
is: 1c+0-11=b. That is, the place where memory fixing
starts is 0xb or 11 bytes away from the definition
of the symbol foo. However, to make the instruction work
properly, we must also subtract 4 from 0xb and the result
is 0x7. Why the extra -4? Because the relative
address starts at the end of an instruction, not the
address where memory fixing starts. For that reason, we must also
exclude the 4 bytes of the overwritten address.
Indeed, looking at the objdump output of the object file
main.o:
$ objdump -M intel -d main.o

Disassembly of section .text:

00000000 <main>:
   0:   55                      push   ebp
   1:   89 e5                   mov    ebp,esp
   3:   83 e4 f0                and    esp,0xfffffff0
   6:   c7 05 00 00 00 00 05    mov    DWORD PTR ds:0x0,0x5
   d:   00 00 00
  10:   e8 fc ff ff ff          call   11 <main+0x11>
  15:   b8 00 00 00 00          mov    eax,0x0
  1a:   c9                      leave
  1b:   c3                      ret

0000001c <foo>:
  1c:   55                      push   ebp
  1d:   89 e5                   mov    ebp,esp
  1f:   90                      nop
  20:   5d                      pop    ebp
  21:   c3                      ret
The place where memory fixing starts is after the opcode
e8, with the mock value fc ff ff ff, which is
-4 in decimal. However, in the assembly code, the value is
displayed as 11, the memory address right after
e8. The reason is that the instruction e8
starts at 10 and ends at 157.
-4 means 4 bytes backward from the end of the instruction,
that is: 15-4=11. After linking, the output of the final
executable file is displayed with the actual memory fixing:
$ gcc $BOOKFLAGS main.c -o main
$ objdump -M intel -d main

08049156 <main>:
 8049156:   55                      push   ebp
 8049157:   89 e5                   mov    ebp,esp
 8049159:   83 e4 f0                and    esp,0xfffffff0
 804915c:   c7 05 10 c0 04 08 05    mov    DWORD PTR ds:0x804c010,0x5
 8049163:   00 00 00
 8049166:   e8 07 00 00 00          call   8049172 <foo>
 804916b:   b8 00 00 00 00          mov    eax,0x0
 8049170:   c9                      leave
 8049171:   c3                      ret

08049172 <foo>:
 8049172:   55                      push   ebp
 8049173:   89 e5                   mov    ebp,esp
 8049175:   90                      nop
 8049176:   5d                      pop    ebp
 8049177:   c3                      ret
In the final output, the opcode e8 previously at
10 now starts at the address
8049166. The mock value
fc ff ff ff is replaced with the actual value
07 00 00 00 using the same calculating
method as in its object file: the opcode e8 is at
8049166. The definition of foo is at
8049172. The offset from the next address
after e8 is 8049172+0-8049167-4=07. However,
for readability, the assembly is displayed as
call 8049172 <foo>, since the GNU assembler8 allows specifying the actual memory
address of a symbol definition. Such an address is later translated into
relative addressing mode, saving the programmer the trouble of
calculating the offset manually.
The R_386_32 relocation of i is even
simpler: the placeholder 00 00 00 00 at offset
8 is replaced by the address of i,
0804c010, which readelf -s main lists in
example 8.3, stored in little-endian order:
10 c0 04 08.
8.1.5 Sym. Name
This field displays the name of a symbol to be relocated. The named symbol is the same as written in a high level language such as C.
8.2 Crafting ELF binary with linker scripts
A linker is a program that combines separate object files
into a final binary file. When gcc is invoked, it runs
ld underneath to turn object files into the final
executable file.
A linker script is a text file that instructs how a linker
should combine object files. When gcc runs, it uses its
default linker script to build the memory layout of a compiled binary
file. A standardized memory layout is called an object file
format, e.g. ELF includes program headers, section headers and
their attributes. The default linker script is made for running in the
current operating system environment9. Running on bare metal,
the default script cannot be used as it is not designed for such an
environment. For that reason, a programmer needs to supply his own
linker script for such environments.
Every linker script consists of a series of commands with the following format:
COMMAND
{
    sub-command 1
    sub-command 2
    .... more sub-commands....
}
Each sub-command is specific to only the top-level command. The
simplest linker script needs only one command: SECTIONS,
that consumes input sections from object files and produces output
sections of the final binary file10.
8.2.1 Example linker script
Here is a minimal example of a linker script:
main.lds
SECTIONS                      /* Command */
{
   . = 0x10000;               /* sub-command 1 */
   .text : { *(.text) }       /* sub-command 2 */
   . = 0x8000000;             /* sub-command 3 */
   .data : { *(.data) }       /* sub-command 4 */
   .bss : { *(.bss) }         /* sub-command 5 */
}
Code Dissection:
SECTIONS: top-level command that declares a list of custom program sections.ldprovides a set of such commands.. = 0x10000;: set the location counter to the address0x10000. The location counter specifies the base address for subsequent commands. In this example, subsequent commands will use0x10000onward..text : { *(.text) }: since the location counter is set to0x10000, the output.textin the final binary file will start at the address0x10000. This command combines all.textsections from all object files with the*(.text)syntax into a final.textsection. The*is the wildcard which matches any file name.. = 0x8000000;: again, the location counter is set to0x8000000. Subsequent commands will use this address for working with sections..data : { *(.data) }: all.datasections are combined into one.datasection in the final binary file..bss : { *(.bss) }: all.bsssections are combined into one.bsssection in the final binary file.
The addresses 0x10000 and 0x8000000 are
called Virtual Memory Addresses. A virtual memory
address is the address where a section is loaded in memory when a
program runs. To use the linker script, we save it as a file
e.g. main.lds11; then, we need a
sample program in a file, e.g. main.c:
main.c
void test() {}
int main(int argc, char *argv[])
{

    return 0;
}
Then, we compile the file and explicitly invoke ld with
the linker script:
$ gcc $BOOKFLAGS -g -c main.c
$ ld -m elf_i386 -o main -T main.lds main.o
In the ld command, the options are similar to
gcc:
| Option | Description |
|---|---|
-m |
Specify the object file format that ld produces. In the
example, elf_i386 means a 32-bit ELF is to be
produced. |
-o |
Specify the name of the final executable binary. |
-T |
Specify the linker script to use. In the example, it is
main.lds. |
The remaining input is a list of object files for linking. After the
command ld is executed, the final executable binary,
main, is produced. If we try running it:
$ ./main
Segmentation fault
The reason is that when linking manually, the entry address must be
explicitly set, or else ld sets it to the start of the
.text section by default. We can verify from the
readelf output:
$ readelf -h main
ELF Header:
  Magic:   7f 45 4c 46 01 01 01 00 00 00 00 00 00 00 00 00
  Class:                             ELF32
  Data:                              2's complement, little endian
  Version:                           1 (current)
  OS/ABI:                            UNIX - System V
  ABI Version:                       0
  Type:                              EXEC (Executable file)
  Machine:                           Intel 80386
  Version:                           0x1
  Entry point address:               0x10000
  Start of program headers:          52 (bytes into file)
  Start of section headers:          4980 (bytes into file)
  Flags:                             0x0
  Size of this header:               52 (bytes)
  Size of program headers:           32 (bytes)
  Number of program headers:         2
  Size of section headers:           40 (bytes)
  Number of section headers:         13
  Section header string table index: 12
The entry point address is set to
0x10000, which is the beginning of the
.text section. Using objdump to examine the
address:
$ objdump -z -M intel -S -D main | lesswe see that the address 0x10000 does not start at the
main function when the program runs:
Disassembly of section .text:

00010000 <test>:
void test() {}
   10000:   55                      push   ebp
   10001:   89 e5                   mov    ebp,esp
   10003:   90                      nop
   10004:   5d                      pop    ebp
   10005:   c3                      ret

00010006 <main>:
int main(int argc, char *argv[])
{
   10006:   55                      push   ebp
   10007:   89 e5                   mov    ebp,esp

    return 0;
   10009:   b8 00 00 00 00          mov    eax,0x0
}
   1000e:   5d                      pop    ebp
   1000f:   c3                      ret
The start of the .text section at
0x10000 is the function
test, not
main! To enable the program to run at
main properly, we need to set the entry point in the linker
script with the following line at the beginning of the file:
ENTRY(main)Recompile the executable binary file main again. This
time, the output from readelf is different:
ELF Header:
  Magic:   7f 45 4c 46 01 01 01 00 00 00 00 00 00 00 00 00
  Class:                             ELF32
  Data:                              2's complement, little endian
  Version:                           1 (current)
  OS/ABI:                            UNIX - System V
  ABI Version:                       0
  Type:                              EXEC (Executable file)
  Machine:                           Intel 80386
  Version:                           0x1
  Entry point address:               0x10006
  Start of program headers:          52 (bytes into file)
  Start of section headers:          4980 (bytes into file)
  Flags:                             0x0
  Size of this header:               52 (bytes)
  Size of program headers:           32 (bytes)
  Number of program headers:         2
  Size of section headers:           40 (bytes)
  Number of section headers:         13
  Section header string table index: 12
The program now executes code at the address
0x10006 when it starts.
0x10006 is where main starts! To make sure we
really start at main, we run the program with
gdb, and set two breakpoints at the main and
test functions:
$ gdb -q ./main
Reading symbols from ./main...
(gdb) b test
Breakpoint 1 at 0x10003: file main.c, line 1.
(gdb) b main
Breakpoint 2 at 0x10009: file main.c, line 5.
(gdb) r
Starting program: /tmp/main

Breakpoint 2, main (argc=-6504741, argv=0x0) at main.c:5
5       return 0;
As displayed in the output, gdb stopped at the
2nd breakpoint first. Now, we run the program normally,
without gdb:
$ ./main
Segmentation fault
We still get a segmentation fault. It is to be expected, as we ran a
custom binary without C runtime support from the operating system. The
last statement in the main function, return 0,
simply returns to a random place12. The C runtime ensures
that the program exits properly. In Linux, the _exit()
function is implicitly called when main returns. To fix
this problem, we simply change the program to exit properly:
hello.c
void test() {}
int main(int argc, char *argv[])
{
    asm("mov eax, 0x1\n"
        "mov ebx, 0x0\n"
        "int 0x80");
}
Inline assembly is required because interrupt 0x80 is
defined for system calls in Linux. Since the program uses no library,
there is no other way to call system functions, aside from using
assembly. The inline assembly is written in Intel syntax, so
-masm=intel must be added to the compile command, as in
chapter 4:
$ gcc $BOOKFLAGS -masm=intel -g -c hello.c
$ ld -m elf_i386 -o hello -T main.lds hello.o
$ ./hello
$ echo $?
0
However, when writing our operating system, we will not need such code, as there is no environment for exiting properly yet.
Now that we can precisely control where the program runs initially,
it is easy to bootstrap the kernel from the bootloader. Before we move
on to the next section, note how readelf and
objdump can be applied to debug a program even before it
runs.
8.2.2 Understand the custom ELF structure
In the example, we managed to create a runnable ELF executable binary
from a custom linker script, as opposed to the default one provided by
gcc. To make it convenient to look into its structure:
$ readelf -e mainThe -e option is the combination of 3 options
-h -l -S:
....... ELF header output omitted .......
Section Headers:
  [Nr] Name              Type            Addr     Off    Size   ES Flg Lk Inf Al
  [ 0]                   NULL            00000000 000000 000000 00      0   0  0
  [ 1] .text             PROGBITS        00010000 001000 000010 00  AX  0   0  1
  [ 2] .debug_info       PROGBITS        00000000 001010 000086 00      0   0  1
  [ 3] .debug_abbrev     PROGBITS        00000000 001096 00007b 00      0   0  1
  [ 4] .debug_aranges    PROGBITS        00000000 001111 000020 00      0   0  1
  [ 5] .debug_line       PROGBITS        00000000 001131 000051 00      0   0  1
  [ 6] .debug_str        PROGBITS        00000000 001182 00008d 01  MS  0   0  1
  [ 7] .debug_line_str   PROGBITS        00000000 00120f 000014 01  MS  0   0  1
  [ 8] .comment          PROGBITS        00000000 001223 00001f 01  MS  0   0  1
  [ 9] .debug_frame      PROGBITS        00000000 001244 000054 00      0   0  4
  [10] .symtab           SYMTAB          00000000 001298 000040 10     11   2  4
  [11] .strtab           STRTAB          00000000 0012d8 000012 00      0   0  1
  [12] .shstrtab         STRTAB          00000000 0012ea 000087 00      0   0  1
Key to Flags:
  W (write), A (alloc), X (execute), M (merge), S (strings), I (info),
  L (link order), O (extra OS processing required), G (group), T (TLS),
  C (compressed), x (unknown), o (OS specific), E (exclude),
  D (mbind), p (processor specific)

Program Headers:
  Type           Offset   VirtAddr   PhysAddr   FileSiz MemSiz  Flg Align
  LOAD           0x001000 0x00010000 0x00010000 0x00010 0x00010 R E 0x1000
  GNU_STACK      0x000000 0x00000000 0x00000000 0x00000 0x00000 RW  0x10

 Section to Segment mapping:
  Segment Sections...
   00     .text
   01
The structure is incredibly simple. Both the segment and section
listings can be contained within one screen. This is not the case with a
default ELF executable binary. From the output, there are only 12
sections, and only one is loaded at runtime: .text, because
it is the only section assigned an actual memory address,
0x10000. The remaining sections are
assigned 0 in the final executable binary13, which means they are not loaded at
runtime. It makes sense, as those sections are related to versioning14, debugging15
and linking16. The .data and
.bss sections named in the script do not appear at all: our
program has no global variable, so they are empty, and ld
drops empty sections.
The program segment header table is even simpler. It only contains 2
segments: LOAD and GNU_STACK. By default, if
the linker script does not supply the instructions for building program
segments, ld provides reasonable default segments. As in
this case, .text should be in the LOAD
segment. The GNU_STACK segment is a GNU extension used by
the Linux kernel to control the state of the program stack. We will not
need this segment, as we write our own operating system from scratch. To
achieve this goal, we will need to create our own program headers
instead of letting ld handle the task.
8.2.3 Manipulate the program segments
First, we need to craft our own program header table by using the following syntax:
PHDRS
{
  <name> <type> [ FILEHDR ] [ PHDRS ] [ AT ( address ) ]
        [ FLAGS ( flags ) ] ;
}
The PHDRS command is similar to the
SECTIONS command, but for declaring a list of custom
program segments with a predefined syntax.
name is the header name, for later
reference by a section declared in the SECTIONS
command.
type is the ELF segment type, as
described in chapter 5, The Anatomy of a Program, section Program header
table, with the added prefix PT_. For example, instead of
NULL or LOAD as displayed by
readelf, it is PT_NULL or
PT_LOAD.
Example 8.5. With only name and
type, we can create any number of program segments. For
example, we can add the NULL program segment and remove the
GNU_STACK segment:
main.lds
PHDRS
{
    null PT_NULL;
    code PT_LOAD;
}

SECTIONS
{
    . = 0x10000;
    .text : { *(.text) } :code
    . = 0x8000000;
    .data : { *(.data) }
    .bss : { *(.bss) }
}
The content of the PHDRS command tells that the final
executable binary contains 2 program segments: NULL and
LOAD. The NULL segment is given the name
null and the LOAD segment is given the name
code to signify this LOAD segment contains
program code. Then, to put a section into a segment, we use the syntax
:<phdr>, where phdr is the name given to
a segment earlier. In this example, the .text section is
put into the code segment. We compile and see the result
(assuming main.o compiled earlier remains):
$ ld -m elf_i386 -o main -T main.lds main.o
$ readelf -l main

Elf file type is EXEC (Executable file)
Entry point 0x10000
There are 2 program headers, starting at offset 52

Program Headers:
  Type           Offset   VirtAddr   PhysAddr   FileSiz MemSiz  Flg Align
  NULL           0x000000 0x00000000 0x00000000 0x00000 0x00000     0x4
  LOAD           0x001000 0x00010000 0x00010000 0x00010 0x00010 R E 0x1000

 Section to Segment mapping:
  Segment Sections...
   00
   01     .text
Those 2 segments are now NULL and LOAD
instead of LOAD and GNU_STACK. Note that we
dropped ENTRY(main) from this script, so the entry point is
back to the start of .text; it does not matter for the
experiments that follow, where the binary is only inspected, never
run.
Example 8.6. We can add as many segments of the same type as we want, as long as they are given different names:
main.lds
PHDRS
{
    null1 PT_NULL;
    null2 PT_NULL;
    code1 PT_LOAD;
    code2 PT_LOAD;
}

SECTIONS
{
    . = 0x10000;
    .text : { *(.text) } :code1
    . = 0x8000000;
    .data : { *(.data) } :code2
    .bss : { *(.bss) }
}
After amending the PHDRS content earlier with this new
segment listing, we put .text into the code1
segment and .data into the code2 segment, we
compile and see the new segments:
$ ld -m elf_i386 -o main -T main.lds main.o
$ readelf -l main

Elf file type is EXEC (Executable file)
Entry point 0x10000
There are 4 program headers, starting at offset 52

Program Headers:
  Type           Offset   VirtAddr   PhysAddr   FileSiz MemSiz  Flg Align
  NULL           0x000000 0x00000000 0x00000000 0x00000 0x00000     0x4
  NULL           0x000000 0x00000000 0x00000000 0x00000 0x00000     0x4
  LOAD           0x001000 0x00010000 0x00010000 0x00010 0x00010 R E 0x1000
  LOAD           0x0000b4 0x00000000 0x00000000 0x00000 0x00000     0x1000

 Section to Segment mapping:
  Segment Sections...
   00
   01
   02     .text
   03
Four program headers are produced, one for each name. The second
LOAD segment is empty, with no address and no flags,
because our program has no global variable and .data
therefore holds nothing. ld creates the header anyway,
since the script asked for it.
Exercise 8.1. Add a global variable
int a = 5; to main.c, recompile and relink
with the script of example 8.6. The second LOAD segment now
holds .data at 0x8000000, with the flags
RW. Then remove the :code2 assignment and
relink: where does .data go, and how big is the
LOAD segment? ld puts a section that is not
assigned to any segment into the segment used by the previous
section.
FILEHDR is an optional keyword, which
when added specifies that a program segment includes the ELF file header
of the executable binary. However, this attribute should only be added
for the first program segment, as it drastically alters the size and
starting address of a segment because the ELF header is always at the
beginning of a binary file; recall that a segment starts at the address
of its first content, which is in most cases (except for this case,
which is the file header) the first section.
Example 8.7. Adding the FILEHDR keyword
changes the size of the NULL segment:
main.lds
PHDRS
{
    null PT_NULL FILEHDR;
    code PT_LOAD;
}
..... content is the same as in example 8.5 .....
We link it again and see the result:
$ ld -m elf_i386 -o main -T main.lds main.o
$ readelf -l main

Elf file type is EXEC (Executable file)
Entry point 0x10000
There are 2 program headers, starting at offset 52

Program Headers:
  Type           Offset   VirtAddr   PhysAddr   FileSiz MemSiz  Flg Align
  NULL           0x000000 0x00000000 0x00000000 0x00034 0x00034 R   0x4
  LOAD           0x001000 0x00010000 0x00010000 0x00010 0x00010 R E 0x1000

 Section to Segment mapping:
  Segment Sections...
   00
   01     .text
In previous examples, the file size and memory size of the
NULL segment are always 0, now they are both
0x34 bytes, which is the size of an ELF header.
Example 8.8. If we assign FILEHDR to a
non-starting segment, its size and starting address change
significantly:
main.lds
PHDRS
{
    null PT_NULL;
    code PT_LOAD FILEHDR;
}
..... content is the same .....
$ ld -m elf_i386 -o main -T main.lds main.o
$ readelf -l main
Elf file type is EXEC (Executable file)
Entry point 0x10000
There are 2 program headers, starting at offset 52
Program Headers:
Type Offset VirtAddr PhysAddr FileSiz MemSiz Flg Align
NULL 0x000000 0x00000000 0x00000000 0x00000 0x00000 0x4
LOAD 0x000000 0x0000f000 0x0000f000 0x01010 0x01010 R E 0x1000
Section to Segment mapping:
Segment Sections...
00
01 .textThe size of the LOAD segment in the previous example is
only 0x10, the same size as the .text section
in it. But now, it is 0x1010,
0x1000 bytes larger. What is the reason for these extra
bytes? A simple answer: segment alignment. From the output, the
alignment of this segment is 0x1000; it means that
regardless of which address is the start of this segment, it must be
divisible by 0x1000. For that reason, the starting address
of LOAD is 0xf000 because it
is divisible by 0x1000.
Another question arises: why is the starting address
0xf000 instead of 0x10000? .text
is the first section, which starts at 0x10000, so the
segment should start at 0x10000. The reason is that we
include FILEHDR as part of the segment, so it must expand
to include the ELF file header, which is at the very start of an ELF
executable binary. To satisfy this constraint and the alignment
constraint, 0xf000 is the closest address. Note that the
virtual and physical memory addresses are the addresses at runtime, not
the locations of the segment in the file on disk. As the
Offset field shows, the segment starts at the very first
byte of the file, and as the FileSiz field shows, it
consumes 0x1010 bytes on disk. The two
figures below illustrate the difference between the memory layouts with
and without the FILEHDR keyword.
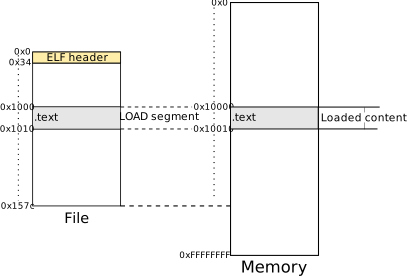
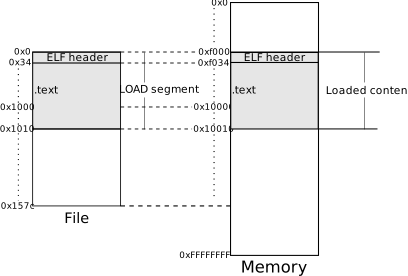
PHDRS is an optional keyword, which
when added specifies that a program segment includes the program segment
header table itself.
Example 8.9. The first segment of the default
executable binary generated by gcc is a PHDR,
a segment whose only content is the program header table, since the
program header table appears right after the ELF header. It looks like a
convenient segment to put the ELF header into as well, using the
FILEHDR keyword. The first edition of this book replaced
the unused NULL segment with such a PHDR
segment:
main.lds
PHDRS
{
    headers PT_PHDR FILEHDR PHDRS;
    code PT_LOAD;
}
..... content is the same .....
With the version of ld used in the first edition
(binutils 2.26), this linked fine. With the version used in this book
(binutils 2.44), and any recent one, it does not:
$ ld -m elf_i386 -o main -T main.lds main.o
ld: main: error: PHDR segment not covered by LOAD segment
No output file is produced. The next section explains the error, which is instructive, and the script that replaces this one.
8.2.4 A segment for the program header table
The error message says exactly what is wrong, once we know what a
PHDR segment is for. The program header table is the part
of the file that a loader (the operating system, or our
bootloader) reads to find out what to copy into memory. The loader reads
it from the file, so why would it need a segment? The answer is in the
ELF specification (System V ABI, chapter 5, “Program Header”):
the PT_PHDR entry “specifies the location and size of the
program header table itself, both in the file and in the memory image of
the program”. Its purpose is to tell the program where its own
program header table ends up in memory, so that code running after the
load can find it. On Linux, that code is the dynamic linker, which
locates the PT_PHDR segment through the auxiliary vector to
find the PT_DYNAMIC segment and the shared libraries to
load. For that to work, the program header table must actually
be in memory, that is, it must lie inside a
PT_LOAD segment, since only PT_LOAD segments
are copied into memory. The specification states it plainly: a
PT_PHDR entry “may occur only if the program header table
is part of the memory image of the program”. A PT_PHDR
segment that no LOAD segment covers describes memory that
will never exist, and modern ld refuses to produce such a
file.
In the script above, the code segment only contains
.text. The ELF header and the program header table are at
the start of the file, outside any LOAD segment, exactly
the situation the error describes. The fix follows from the explanation:
put FILEHDR and PHDRS on the LOAD
segment, so that the headers are part of the memory image, and keep the
PT_PHDR entry as a pure description of where the table
is:
main.lds
PHDRS
{
    headers PT_PHDR PHDRS;
    code PT_LOAD FILEHDR PHDRS;
}
..... content is the same .....
$ ld -m elf_i386 -o main -T main.lds main.o
$ readelf -l main
Elf file type is EXEC (Executable file)
Entry point 0x10000
There are 2 program headers, starting at offset 52
Program Headers:
Type Offset VirtAddr PhysAddr FileSiz MemSiz Flg Align
PHDR 0x000034 0x0000f034 0x0000f034 0x00040 0x00040 R 0x4
LOAD 0x000000 0x0000f000 0x0000f000 0x01010 0x01010 R E 0x1000
Section to Segment mapping:
Segment Sections...
00
01 .textAs shown in the output, the first segment is of type
PHDR. It starts at file offset
0x34, right after the ELF header, and its size is
0x40: the program segment header table has
2 entries, each 0x20 bytes (32 bytes) in length. The
LOAD segment is the same as in example 8.8, starting at
file offset 0 with the ELF header, and it now covers the
PHDR segment: file offsets 0x34 to
0x74 are inside 0 to 0x1010, and
memory addresses 0xf034 to 0xf074 are inside
0xf000 to 0x10010. The above numbers are
consistent with the ELF header output:
$ readelf -h main
ELF Header:
  Magic:   7f 45 4c 46 01 01 01 00 00 00 00 00 00 00 00 00
  Class:                             ELF32
....... output omitted ......
  Size of this header:               52 (bytes)   --> 0x34 bytes
  Size of program headers:           32 (bytes)   --> 0x20 bytes each program header
  Number of program headers:         2            --> 0x40 bytes in total
  Size of section headers:           40 (bytes)
  Number of section headers:         13
  Section header string table index: 12
Our operating system will not have a dynamic linker and does not need
a PT_PHDR entry at all. We keep it because it costs
nothing, because it documents where the table is, and because the
arrangement it forces, headers inside the first LOAD
segment, is precisely the one our bootloader relies on: the bootloader
copies the file as a whole into memory and reads the entry point from
the ELF header there, as we will see shortly.
AT(address) specifies the load memory
address where the segment is placed. Every segment or section has a
virtual memory address and a load memory address:
A virtual memory address is the starting address of a segment or a section when a program is in memory and running. The memory address is called virtual because it does not map to the actual memory cell that corresponds to the address number, but to any random memory cell, which depends on how the underlying operating system translates the address. For example, the virtual memory address
0x1might map to the memory cell with the physical address0x1000.A load memory address is the physical memory address where a program is loaded but not yet running.
The load memory address is specified by the AT syntax.
Normally both types of addresses are the same, and the physical address
can be ignored. They differ when loading and running are purposely
divided into two distinct phases that require different address
regions.
For example, a program can be designed to load into a ROM17 at a fixed address. But when loading into RAM for a bare-metal application or an operating system to use, the program needs a load address that accommodates the addressing scheme of the target application or operating system.
Example 8.10. We can specify a load memory address
for the segment PHDR with the AT syntax:
main.lds
PHDRS
{
    headers PT_PHDR PHDRS AT(0x500);
    code PT_LOAD FILEHDR PHDRS;
}
..... content is the same .....
$ ld -m elf_i386 -o main -T main.lds main.o
$ readelf -l main
Elf file type is EXEC (Executable file)
Entry point 0x10000
There are 2 program headers, starting at offset 52
Program Headers:
Type Offset VirtAddr PhysAddr FileSiz MemSiz Flg Align
PHDR 0x000034 0x0000f034 0x00000500 0x00040 0x00040 R 0x4
LOAD 0x000000 0x0000f000 0x0000f000 0x01010 0x01010 R E 0x1000
Section to Segment mapping:
Segment Sections...
00
01 .textOnly the PhysAddr field of the PHDR segment
changed. It depends on the operating system whether to use the address
or not. For our operating system, the virtual memory address and the
load address are the same, so an explicit load address is none of our
concern.
FLAGS(flags) assigns permissions to a
segment. Each flag is an integer that represents a permission and can be
combined with OR operations. Possible values:
| Permission | Value | Description |
|---|---|---|
| R | 1 |
Readable |
| W | 2 |
Writable |
| E | 4 |
Executable |
Example 8.11. We can create a LOAD
segment with Read, Write and Execute permissions enabled:
main.lds
PHDRS
{
    headers PT_PHDR PHDRS;
    code PT_LOAD FILEHDR PHDRS FLAGS(0x1 | 0x2 | 0x4);
}
..... content is the same .....
$ ld -m elf_i386 -o main -T main.lds main.o
ld: warning: main has a LOAD segment with RWX permissions
$ readelf -l main
Elf file type is EXEC (Executable file)
Entry point 0x10000
There are 2 program headers, starting at offset 52
Program Headers:
Type Offset VirtAddr PhysAddr FileSiz MemSiz Flg Align
PHDR 0x000034 0x0000f034 0x0000f034 0x00040 0x00040 R 0x4
LOAD 0x000000 0x0000f000 0x0000f000 0x01010 0x01010 RWE 0x1000
Section to Segment mapping:
Segment Sections...
00
01 .textThe LOAD segment now gets all the
RWE permissions, as shown above.
ld also prints a warning. Since binutils 2.39, the linker
complains whenever a LOAD segment is writable and
executable at the same time, because memory that can be both modified
and executed is what most exploits need: an attacker who can write into
such a segment can run whatever he wrote there. A hosted program gets
separate segments for code and data, and the operating system maps them
with different page permissions. Our operating system has no such
protection yet (chapter 12 introduces paging), and until then our kernel
will keep .text, .data and .bss
in the same RWE segment, exactly what the warning is about.
The warning is harmless but noisy, so the Makefiles of the book pass
--no-warn-rwx-segments to ld. When
FLAGS is not given, ld computes the flags from
the sections put into the segment: R E when it only holds
code, RW when it only holds data, and RWE when
it holds both.
Finally, if we want to remove .eh_frame or any unwanted
section, we add a special section called /DISCARD/:
main.lds
... program segment header table remains the same ...

SECTIONS
{
    . = 0x10000;
    .text : { *(.text) } :code
    . = 0x8000000;
    .data : { *(.data) }
    .bss : { *(.bss) }
    /DISCARD/ : { *(.eh_frame) }
}
Any section put in /DISCARD/ disappears from the final
executable binary. With $BOOKFLAGS there is no
.eh_frame to discard, since
-fno-asynchronous-unwind-tables stops gcc from producing
one. To see the rule at work, compile main.c once without
that flag:
$ gcc -m32 -fno-pie -g -c main.c -o main_eh.o
$ readelf -S main_eh.o | grep eh_frame
  [15] .eh_frame         PROGBITS        00000000 000278 000058 00   A  0   0  4
  [16] .rel.eh_frame     REL             00000000 00041c 000010 08   I 17  15  4
Linked with the script of example 8.11, .eh_frame lands
in the LOAD segment next to .text, because
ld puts a section that the script does not mention into the
segment of the previous section:
$ ld -m elf_i386 -o main -T main.lds main_eh.o
$ readelf -l main
....... output omitted ......
 Section to Segment mapping:
  Segment Sections...
   00
   01     .text .eh_frame
With the /DISCARD/ line added to the script,
.eh_frame is nowhere to be found:
$ ld -m elf_i386 -o main -T main.lds main_eh.o
$ readelf -l main
....... output omitted ......
 Section to Segment mapping:
  Segment Sections...
   00
   01     .text
The rule stays in the kernel’s linker script as a safety net: should
a compiler flag change, .eh_frame is for exception handling
and is useless on bare metal.
8.3 C Runtime: Hosted vs Freestanding
The purpose of the .init, .init_array,
.fini_array and .preinit_array sections is to
initialize a C Runtime environment that supports the C standard
libraries. Why does C need a runtime environment, when it is supposed to
be a compiled language? The reason is that many of the standard
functions depend on the underlying operating system, which is of itself
a big runtime environment. For example, I/O related functions such as
reading from the keyboard with gets(), reading from a file
with open(), printing on screen with printf(),
managing system memory with malloc(), free(),
etc.
A C implementation cannot provide such routines without a running operating system, which is a hosted environment. A hosted environment is a runtime environment that:
provides a default implementation of the C libraries that includes system-dependent data and routines.
performs resource allocations to prepare an environment for a program to run.
This process is similar to the hardware initialization process:
When first powered up, a desktop computer loads its basic system routines from a read-only memory stored on the motherboard.
Then, it starts initializing an environment, such as setting default values for various registers in the CPU and devices, before executing any code.
In contrast, a freestanding environment is an environment
that does not provide system-dependent data and routines. As a
consequence, almost no C library exists and the environment can only run
code written in pure C syntax. For a freestanding environment to become
a hosted environment, it must implement the standard C system routines.
But for a conforming freestanding environment, it only needs
these header files available: <float.h>,
<limits.h>, <stdarg.h> and
<stddef.h> (according to the GCC manual).
For a typical desktop x86 program, the C runtime environment is initialized by the compiler so a program runs normally. However, for an embedded platform where a program runs directly on the hardware, this is not the case. The typical C runtime environment used in desktop operating systems cannot be used on embedded platforms, because of architectural differences and resource constraints. As such, the software writer must implement a custom C runtime environment suitable for the targeted platform.
In writing our operating system, the first step is to create a freestanding environment before creating a hosted one.
gcc knows about both kinds of environments, and a few flags tell it
which one we are compiling for. The kernel of this chapter is compiled
with these flags, in addition to the $BOOKFLAGS of chapter
0:
-ffreestandingtells gcc that there is no C library and no runtime: it stops assuming thatmainis special, thatprintformemcpybehave as the standard says, and it does not replace one by a call to the other.-nostdlibtells gcc not to link the C runtime start files (crt1.o, the code that callsmainand_exit) and the standard libraries. Nothing but our own object files goes into the kernel.-fno-stack-protectordisables a feature that a hosted environment provides and ours does not. Many distributions configure gcc to protect every function that has a local array against buffer overflows: the function stores a random value, the canary, on the stack at entry and checks it before returning. That value is kept in the thread control block, which the C runtime sets up and gcc reads through thegssegment register, and the check calls__stack_chk_failfrom the C library. Neither exists on bare metal. Our tinymainhas no array, so the flag changes nothing yet, but the first function with a local buffer would otherwise crash with a mysterious fault; we switch it off now.-fcf-protection=noneis already in$BOOKFLAGS; on bare metal it matters more than for a hosted program. Theendbr32markers it removes are harmless, but the shadow stack they belong to must be enabled by the operating system, and ours does not know about it.
8.4 Debuggable bootloader on bare metal
Currently, the bootloader is compiled as a flat binary file. Although
gdb can display the assembly code, it is not always the
same as the source code. In the assembly source code, there exist
variable names and labels. These symbols are lost when compiled as a
flat binary file, making debugging more difficult. Another issue is the
mismatch between the written assembly source code and the displayed
assembly source code. The written code might contain higher level syntax
that is assembler-specific and is generated into lower-level assembly
code as displayed by gdb. Finally, with debug information
available, the commands next/n and step/s can
be used instead of ni and si.
To enable debug information, we modify the bootloader Makefile:
The bootloader must be compiled as an ELF binary. Open the Makefile in the
bootloader/directory and change this line under the$(BUILD_DIR)/%.o: %.asmrecipe:nasm -f bin $< -o $@to this line:
nasm -f elf $< -F dwarf -g -o $@In the updated recipe, the
binformat is replaced with theelfformat to enable debugging information to be properly produced. The-Foption specifies the debug information format, which isdwarfin this case. Finally, the-goption causesnasmto actually generate debug information in the selected format.Then,
ldconsumes the ELF bootloader binary and produces another ELF bootloader binary, with a proper starting memory address of the.textsection that matches the actual address of the bootloader at runtime, when the QEMU virtual machine loads it at0x7c00. We needldbecause when compiled bynasm, the starting address is assumed to be0, not0x7c00. The address comes from a small linker script,bootloader.lds, written with what we learned in the previous section:bootloader/bootloader.lds
OUTPUT(bootloader); PHDRS { headers PT_NULL; text PT_LOAD FILEHDR PHDRS ; data PT_LOAD ; } SECTIONS { . = SIZEOF_HEADERS; .text 0x7c00: { *(.text) } :text .data : { *(.data) } :data }.textis placed at0x7c00, so every label gets the address it will have when the BIOS has loaded the sector.SIZEOF_HEADERSis a built-in constant, the size of the ELF header plus the program headers; starting the location counter there keeps.textafter the headers in the file.Finally, we use
objcopyto extract only the flat binary content, as the original bootloader, by adding this line to$(BUILD_DIR)/%.o: %.asm:objcopy -O binary $@.elf $@objcopy, as its name implies, is a program that copies and translates object files. Here, we copy the original ELF bootloader and translate it into a flat binary file. The flat binary contains only the.textsection, the same 512 bytesnasm -f binproduced; the ELF file next to it,bootloader.o.elf, keeps the symbols and the line numbers forgdb.
The updated Makefile looks like this:
bootloader/Makefile
BUILD_DIR=../build/bootloader

BOOTLOADER_SRCS := $(wildcard *.asm)
BOOTLOADER_OBJS := $(patsubst %.asm, $(BUILD_DIR)/%.o, $(BOOTLOADER_SRCS))

all: $(BOOTLOADER_OBJS)

$(BUILD_DIR)/%.o: %.asm
    mkdir -p $(BUILD_DIR)
    nasm -f elf $< -F dwarf -g -o $@
    ld -m elf_i386 --no-warn-rwx-segments -T bootloader.lds $@ -o $@.elf
    objcopy -O binary $@.elf $@

clean:
    rm -rf $(BUILD_DIR)
The --no-warn-rwx-segments option silences the warning
discussed in example 8.11; the bootloader has no separate data, but the
same Makefile serves the later chapters where it does.
Now we test the bootloader with debug information available:
Start the QEMU machine:
$ make qemuStart
gdbwith the debug information stored inbootloader.o.elf:$ gdb build/bootloader/bootloader.o.elfIf the
.gdbinitof chapter 7, Bootloader, section Automate debugging steps with GDB script, is used, the output should look like:[f000:fff0] 0x0000fff0 in ?? () Breakpoint 1 at 0x7c00: file bootloader.asm, line 6. (gdb)gdbnow understands where the instruction at the address0x7c00is in the assembly source file, thanks to the debug information. Typecto run to the breakpoint, thennto step over whole source lines:(gdb) c Continuing. [ 0:7c00] Breakpoint 1, start () at bootloader.asm:6 6 start: jmp boot (gdb) n [ 0:7c24] 12 cli ; no interrupts (gdb) n [ 0:7c25] 13 cld ; all that we need to init
Later in this chapter, the .gdbinit file gains a line
symbol-file build/os/os that loads the symbols of the
operating system. The symbol-file command replaces
the symbol table, including the one given on the command line, so with
that .gdbinit the breakpoint message loses its file and
line. To debug the bootloader and the operating system in the same
session, add the bootloader symbols on top with
add-symbol-file:
(gdb) add-symbol-file build/bootloader/bootloader.o.elf
add symbol table from file "build/bootloader/bootloader.o.elf"
(gdb) b *0x7c00
Breakpoint 1 at 0x7c00: file bootloader.asm, line 6.
8.5 Debuggable program on bare metal
The process of building a debug-ready executable binary is similar to
that of a bootloader, except more involved. Recall that for a debugger
to work properly, its debugging information must contain correct address
mappings between memory addresses and the source code. gcc
stores such mapping information in DIE entries, in which it tells
gdb which code address corresponds to a line in a source
file, so that breakpoints work properly.
But first, we need a sample C source file, a very simple one:
os/main.c
void main(){}Because this is a freestanding environment, standard libraries that
involve system functions such as printf() would not work,
because a C runtime does not exist. At this stage, the goal is to
correctly jump to main with the source code displayed
properly in gdb, so no fancy C code is needed yet.
The next step is updating os/Makefile:
os/Makefile
BUILD_DIR=../build/os
OS=$(BUILD_DIR)/os

# -ffreestanding -nostdlib: no C runtime, no standard library (chapter 8).
# -m32: 32-bit code.  -no-pie/-fno-pie: fixed addresses, no relocation at
# load time (see chapter 4).  -fno-asynchronous-unwind-tables and
# -fcf-protection=none keep the generated code free of .eh_frame data and
# endbr32 instructions that mean nothing on bare metal.
CFLAGS+=-ffreestanding -nostdlib -m32 -no-pie -fno-pie \
        -fno-asynchronous-unwind-tables -fcf-protection=none -fno-stack-protector \
        -O0 -gdwarf-4 -ggdb3

OS_SRCS := $(wildcard *.c)
OS_OBJS := $(patsubst %.c, $(BUILD_DIR)/%.o, $(OS_SRCS))

all: $(OS)

$(BUILD_DIR)/%.o: %.c
    mkdir -p $(BUILD_DIR)
    gcc $(CFLAGS) -c $< -o $@

$(OS): $(OS_OBJS)
    ld -m elf_i386 -nmagic --no-warn-rwx-segments -T os.lds $(OS_OBJS) -o $@

clean:
    rm -rf $(BUILD_DIR)
We updated the Makefile with the following changes:
Add a
CFLAGSvariable for passing options togcc. It contains the flags of$BOOKFLAGSspelled out, the freestanding flags explained in the previous section, and-gdwarf-4 -ggdb3for the richest debug informationgdbcan use.Instead of the rule to build assembly source code earlier, it is replaced with a C version with a recipe to build C source files. The
CFLAGSvariable makes thegcccommand in the recipe look cleaner regardless of how many options are added.Add a linking command for building the final executable binary of the operating system with a custom linker script
os.lds. The-nmagicoption is explained later in this chapter; for the moment, note only that it is there.
Everything looks good, except for the linker script part. Why is it
needed? The linker script is required for controlling at which physical
memory address the operating system binary appears in memory, so the
bootloader can jump to the operating system code and execute it. To
complete this requirement, the default linker script used by
gcc would not work as it assumes the compiled executable
runs inside an existing operating system, while we are writing an
operating system itself.
The next question is, what will be the content of the linker script? To answer this question, we must understand what goals to achieve with the linker script:
For the bootloader to correctly jump to and execute the operating system code.
For
gdbto debug correctly with the operating system source code.
To achieve the goals, we must devise a design of a suitable memory
layout for the operating system. Recall that the bootloader developed in
chapter 7, Bootloader, can already load a simple binary compiled from
the sample Assembly program sample.asm. To load the
operating system, we can simply replace the binary compiled from
sample.asm with the binary compiled from
main.c above.
If only it were that simple. The idea is correct, but not enough. The goals imply the following constraints:
The operating system code is written in C and compiled as an ELF executable binary. It means the bootloader needs to retrieve the correct entry address from the ELF header.
To debug properly with
gdb, the debug info must contain correct mappings between instruction addresses and source code.
Thanks to the understanding of ELF and DWARF acquired in the earlier chapters, we can certainly modify the bootloader and create an executable binary that satisfies the above constraints. We will solve these problems one by one.
8.5.1 Loading an ELF binary from a bootloader
Earlier we examined that an ELF header contains the entry address of
a program. That information is 0x18 bytes away from the beginning of an
ELF header, according to man elf:
typedef struct {
               unsigned char e_ident[EI_NIDENT];
               uint16_t      e_type;
               uint16_t      e_machine;
               uint32_t      e_version;
               ElfN_Addr     e_entry;
               ElfN_Off      e_phoff;
               ElfN_Off      e_shoff;
               uint32_t      e_flags;
               uint16_t      e_ehsize;
               uint16_t      e_phentsize;
               uint16_t      e_phnum;
               uint16_t      e_shentsize;
               uint16_t      e_shnum;
               uint16_t      e_shstrndx;
           } ElfN_Ehdr;
The offset from the start of the struct to the start of
e_entry is:
16 bytes of
e_ident[EI_NIDENT]:#define EI_NIDENT 162 bytes of
e_type2 bytes of
e_machine4 bytes of
e_version
e_entry is of type ElfN_Addr, in which
N is either 32 or 64. We are
writing a 32-bit operating system, in this case
and so ElfN_Addr is Elf32_Addr, which is 4
bytes long.
Example 8.12. With any program, such as this simple one:
hello.c
#include <stdio.h>

int main(int argc, char *argv[])
{
    printf("hello world!\n");
    return 0;
}
We can retrieve the entry address with a human-readable presentation
using readelf:
$ gcc $BOOKFLAGS hello.c -o hello
$ readelf -h hello

ELF Header:
  Magic:   7f 45 4c 46 01 01 01 00 00 00 00 00 00 00 00 00
  .... output omitted ....
  Entry point address:               0x8049050
  .... output omitted ....
Or in raw binary with hd:
$ hd hello | less
00000000  7f 45 4c 46 01 01 01 00  00 00 00 00 00 00 00 00  |.ELF............|
00000010  02 00 03 00 01 00 00 00  50 90 04 08 34 00 00 00  |........P...4...|
.........
The offset 0x18 is the start of the least-significant
byte of e_entry, which is 50,
followed by 90 04 08; together in reverse
they make the address 0x08049050.
Now that we know the position of the entry address in the ELF header, it is easy to modify the bootloader made in chapter 7, Bootloader, section Read and load sectors from a floppy disk, to retrieve and jump to the address:
bootloader/bootloader.asm
;******************************************
; Bootloader.asm
; A Simple Bootloader
;******************************************
bits 16
start: jmp boot

;; constant and variable definitions
msg db  "Welcome to My Operating System!", 0ah, 0dh, 0h

boot:
  cli   ; no interrupts
  cld   ; all that we need to init

  mov       ax, 50h

  ; ;; set the buffer
    mov es, ax
    xor bx, bx

  mov   al, 17                        ; read 2 sector
    mov ch, 0                         ; we are reading the second sector past us, so it is still on track 0
    mov cl, 2                         ; sector to read (The second sector)
    mov dh, 0                         ; head number
    mov dl, 0                         ; drive number. Remember Drive 0 is floppy drive.

  mov   ah, 0x02                  ; read floppy sector function
    int 0x13                          ; call BIOS - Read the sector
  jmp   [500h + 0x18]               ; jump and execute the sector!

  hlt   ; halt the system

  ; We have to be 512 bytes. Clear the rest of the bytes with 0
  times 510 - ($-$$) db 0
  dw 0xAA55               ; Boot signature
It is as simple as that! First, we load the operating system binary
at 0x500, then we retrieve the entry address at the offset
0x18 from 0x500, by first calculating the
expression
to get the actual in-memory address, then retrieving the content by
dereferencing it. Two details changed from chapter 7: the jump is now
indirect, jmp [500h + 0x18], through the entry address
stored in memory, and the number of sectors in al grew from
1 to 17. An ELF file is much bigger than one sector, as we will see; 17
sectors (8.5 KiB, from 0x500 to 0x2700) is
more than the part that must be in memory needs, and it stays well below
the bootloader at 0x7c00.
The first part is done. For the next part, we need to build an ELF operating system image for the bootloader to load. The first step is to create a linker script, with the segment layout established in the section A segment for the program header table:
os/os.lds
ENTRY(main);

PHDRS
{
  headers PT_PHDR PHDRS;
  code PT_LOAD FILEHDR PHDRS;
}

SECTIONS
{
  .text 0x500 : { *(.text) } :code
  .data : { *(.data) } :code
  .bss  : { *(.bss) }  :code
  /DISCARD/ : { *(.eh_frame) *(.note.*) }
}
The script is straightforward and remains almost the same as before. The only differences are:
mainis explicitly specified as the entry point by specifyingENTRY(main)..textis explicitly specified with0x500as its virtual memory address since we load the operating system image at0x500..dataand.bssare explicitly put into thecodesegment. They are empty for now, but when the kernel gets its first global variable, we want it in the segment the bootloader loads, not in a secondLOADsegment the bootloader knows nothing about./DISCARD/also drops the.note.*sections that some versions of gcc andldadd to describe the build; they are as useless on bare metal as.eh_frame.
After putting in the script, we compile with make (leave
out -nmagic from os/Makefile for this first
attempt), and it should work smoothly:
$ make clean; make
$ readelf -l build/os/os

Elf file type is EXEC (Executable file)
Entry point 0x500
There are 2 program headers, starting at offset 52

Program Headers:
  Type           Offset   VirtAddr   PhysAddr   FileSiz MemSiz  Flg Align
  PHDR           0x000034 0x00000034 0x00000034 0x00040 0x00040 R   0x4
  LOAD           0x000000 0x00000000 0x00000000 0x00506 0x00506 R E 0x1000

 Section to Segment mapping:
  Segment Sections...
   00
   01     .text
All looks good, until we run it. We begin by starting the QEMU virtual machine:
$ make qemuThen, start gdb, load the debug info (which is also in
the same binary file) and set a breakpoint at main:
(gdb) symbol-file build/os/os
Reading symbols from build/os/os...
(gdb) b main
Breakpoint 2 at 0x500: file main.c, line 1.
Keep the program running until it stops at main:
(gdb) c
Continuing.
[   0:7c00]
Breakpoint 1, 0x00007c00 in ?? ()
(gdb) c
Continuing.
[   0: 500]
Breakpoint 2, main () at main.c:1
At this point, we switch the layout to the C source code instead of the registers:
(gdb) layout splitlayout split creates a layout that consists of 3 smaller
windows:
Source window at the top.
Assembly window in the middle.
Command window at the bottom.
After the command, the layout should look like this:
   ┘││ main.c│││││││││││││││││││││││││││││││││││││││││││││││││││││││┐
B+>─ 1       void main(){}                                        ─
   ─ 2                                                              ─
   ─ 3                                                              ─
   ─ 4                                                              ─
   ─ 5                                                              ─
   ─ 6                                                              ─
   ─ 7                                                              ─
   ─ 8                                                              ─
   ─ 9                                                              ─
   ─ 10                                                             ─
   ─ 11                                                             ─
   ─ 12                                                             ─
   ─ 13                                                             ─
   ─ 14                                                             ─
   ─ 15                                                             ─
   ─ 16                                                             ─
   └│││││││││││││││││││││││││││││││││││││││││││││││││││││││││││││││┌
B+>─ 0x500 <main>    jg     0x547                                   ─
   ─ 0x502 <main+2>  dec    esp                                     ─
   ─ 0x503 <main+3>  inc    esi                                     ─
   ─ 0x504 <main+4>  add    DWORD PTR [ecx],eax                     ─
   ─ 0x506           add    DWORD PTR [eax],eax                     ─
   ─ 0x508           add    BYTE PTR [eax],al                       ─
   ─ 0x50a           add    BYTE PTR [eax],al                       ─
   ─ 0x50c           add    BYTE PTR [eax],al                       ─
   ─ 0x50e           add    BYTE PTR [eax],al                       ─
   ─ 0x510           add    al,BYTE PTR [eax]                       ─
   ─ 0x512           add    eax,DWORD PTR [eax]                     ─
   ─ 0x514           add    DWORD PTR [eax],eax                     ─
   ─ 0x516           add    BYTE PTR [eax],al                       ─
   ─ 0x518           add    BYTE PTR ds:0x340000,al                 ─
   ─ 0x51e           add    BYTE PTR [eax],al                       ─
   ─ 0x520           jo     0x55f                                   ─
   ─ 0x522           add    BYTE PTR [eax],al                       ─
   └│││││││││││││││││││││││││││││││││││││││││││││││││││││││││││││││┌
remote Thread 1 In: main                            L1    PC: 0x500
[f000:fff0] 0x0000fff0 in ?? ()
Breakpoint 1 at 0x7c00
(gdb) symbol-file build/os/os
Reading symbols from build/os/os...
(gdb) b main
Breakpoint 2 at 0x500: file main.c, line 1.
(gdb) c
Continuing.
[   0:7c00]
Breakpoint 1, 0x00007c00 in ?? ()
(gdb) c
Continuing.
[   0: 500]
Breakpoint 2, main () at main.c:1
(gdb) layout split
(gdb)
Something wrong is going on here. It is not the generated assembly
code for a function call as it is known in chapter 4, x86 Assembly and
C, section Function Call and Return. It is definitely wrong, verified
with objdump:
$ objdump -D build/os/os | less
build/os/os:     file format elf32-i386


Disassembly of section .text:

00000500 <main>:
 500:   55                      push   %ebp
 501:   89 e5                   mov    %esp,%ebp
 503:   90                      nop
 504:   5d                      pop    %ebp
 505:   c3                      ret
.... remaining output omitted ....
The assembly code of main is completely different. This
is why understanding assembly code and its relation to high-level
languages is important. Without the knowledge, we would have used
gdb as a simple source-level debugger without bothering to
look at the assembly code from the split layout. As a consequence, the
true cause of the non-working code could never have been discovered.
8.5.2 Debugging the memory layout
What is the reason for the incorrect Assembly code in
main displayed by gdb? There can only be one
cause: the bootloader jumped to the wrong address. But why was the
address wrong? We made the .text section at address
0x500, in which main code is in the first byte
for executing, and instructed the bootloader to retrieve the address at
the offset 0x18, then jump to the entry address.
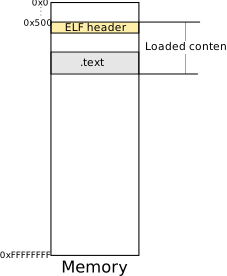
Then, it might be possible for the bootloader to load the operating
system at the wrong address. But then, we explicitly set the load
address to 50h:00, which is 0x500, and so the
correct address was used. After the bootloader loads the 2nd
sector, the in-memory state should look like the figure above.
Here is the problem: 0x500 is the start of the ELF
header. The bootloader actually loads the 2nd sector, which
stores the executable as a whole, to 0x500. Clearly, the
.text section, where main resides, is far from
0x500. Since the in-memory address of the first byte of the
executable binary is 0x500, .text should be at
0x500+0x500=0xa00. However, the entry address recorded in
the ELF header remains 0x500 and as a result, the
bootloader jumped there instead of 0xa00. We can check it
from gdb: the bytes at 0x500 are the magic
number of the ELF header, 7f 45 4c 46, that is
0x7f followed by ELF, which the disassembler
obligingly decodes as jg 0x547:
(gdb) x/16xb 0x500
0x500 <main>:   0x7f    0x45    0x4c    0x46    0x01    0x01    0x01    0x00
0x508:  0x00    0x00    0x00    0x00    0x00    0x00    0x00    0x00
This is one of the issues that must be fixed.
The other issue is the mapping between debug info and the memory
address. Because the debug info is compiled with the assumed offset
0x500 that is the start of .text section, but
due to actual loading, the offset is pushed another 0x500
bytes, making the address actually at 0xa00. This memory
mismatch renders the debug info useless.
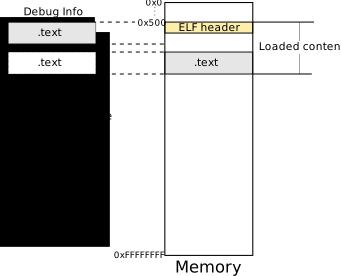
In summary, we have 2 problems to overcome:
Fix the entry address to account for the extra offset when loading into memory.
Fix the debug info to account for the extra offset when loading into memory.
First, we need to know the actual layout of the compiled executable binary:
$ readelf -l build/os/os
Elf file type is EXEC (Executable file)
Entry point 0x500
There are 2 program headers, starting at offset 52
Program Headers:
  Type           Offset   VirtAddr   PhysAddr   FileSiz MemSiz  Flg Align
  PHDR           0x000034 0x00000034 0x00000034 0x00040 0x00040 R   0x4
  LOAD           0x000000 0x00000000 0x00000000 0x00506 0x00506 R E 0x1000
 Section to Segment mapping:
  Segment Sections...
   00
   01     .text
Notice the Offset and the VirtAddr fields
of the LOAD segment: both are 0. Since the
segment starts with the ELF header, this says that the linker expects
the first byte of the file to land at address 0, and it
placed .text at file offset 0x500 so that it
gets the virtual address 0x500 we asked for18.
The entry address and the memory addresses in the debug info are all
computed from this assumption. But the bootloader puts the first byte of
the file at 0x500, not at 0, so the real
in-memory address of everything is 0x500 greater than the
VirtAddr the linker wrote down. The layout we want is one
where the LOAD segment has VirtAddr
0x500 and Offset 0: then the
linker’s idea of memory and the bootloader’s agree.
Why did the linker push .text to file offset
0x500, leaving 0x48c bytes of zeros between
the headers and the code? If we try to adjust the virtual memory address
of the .text section in the linker script
os.lds, whatever value we set also moves .text
to the same file offset, until we set it to some value equal to or
greater than 0x1074:
Elf file type is EXEC (Executable file)
Entry point 0x1074
There are 2 program headers, starting at offset 52
Program Headers:
  Type           Offset   VirtAddr   PhysAddr   FileSiz MemSiz  Flg Align
  PHDR           0x000034 0x00001034 0x00001034 0x00040 0x00040 R   0x4
  LOAD           0x000000 0x00001000 0x00001000 0x0007a 0x0007a R E 0x1000
 Section to Segment mapping:
  Segment Sections...
   00
   01     .text
The segment now starts at virtual address 0x1000 and is
only 0x7a bytes long: .text sits at file
offset 0x74, right after the headers. If we adjust the
virtual address to 0x1073, the segment is back at
0 and .text at file offset
0x1073:
Elf file type is EXEC (Executable file)
Entry point 0x1073
There are 2 program headers, starting at offset 52
Program Headers:
  Type           Offset   VirtAddr   PhysAddr   FileSiz MemSiz  Flg Align
  PHDR           0x000034 0x00000034 0x00000034 0x00040 0x00040 R   0x4
  LOAD           0x000000 0x00000000 0x00000000 0x01079 0x01079 R E 0x1000
 Section to Segment mapping:
  Segment Sections...
   00
   01     .text
The key to answering such a phenomenon is in the Align
field. The value 0x1000 indicates that the virtual address
and the file offset of the segment must be congruent modulo
0x1000: a loader that maps the file into memory page by
page can then map it without moving any byte. The segment starts at file
offset 0, so its virtual address must be a multiple of
0x1000, and .text must be at the file offset
equal to its virtual address modulo 0x1000. We can do some
experiments to verify this claim19:
By setting the virtual address of
.textto0x0(inos.lds), the link fails:ld: ../build/os/os: not enough room for program headers, try linking with -N ld: final link failed: bad valueThe first
0x74bytes of the segment are taken by the ELF header and the program headers, and.textcannot be at offset0as well. Remember the hint about-N; we will come back to it.By setting the virtual address of
.textto0x74(inos.lds):Elf file type is EXEC (Executable file) Entry point 0x74 There are 2 program headers, starting at offset 52 Program Headers: Type Offset VirtAddr PhysAddr FileSiz MemSiz Flg Align PHDR 0x000034 0x00000034 0x00000034 0x00040 0x00040 R 0x4 LOAD 0x000000 0x00000000 0x00000000 0x0007a 0x0007a R E 0x1000 Section to Segment mapping: Segment Sections... 00 01 .text.textdirectly follows the headers, at file offset0x74, and the segment is as small as it can be:0x74bytes of headers plus6bytes of code.By setting the virtual address of
.textto any value between0x75and0x1073(inos.lds),.texttakes the file offset equal to the value specified, and the gap is filled with zeros, as can be seen in the case of0x1073above and in our first attempt with0x500.By setting the virtual address of
.textto any value equal to or greater than0x1074: it starts all over again. With0x1074, the segment starts at virtual address0x1000and.textis at file offset0x74again, where the distance is equal to0x1000bytes.
Now we get a hint of how to control the values of Offset
and VirtAddr to produce a desired binary layout. What we
need is to change the Align field to a smaller value for
finer-grained control. It might work out with a binary layout like
this:
Elf file type is EXEC (Executable file)
Entry point 0x600
There are 2 program headers, starting at offset 52
Program Headers:
  Type           Offset   VirtAddr   PhysAddr   FileSiz MemSiz  Flg Align
  PHDR           0x000034 0x00000534 0x00000534 0x00040 0x00040 R   0x4
  LOAD           0x000000 0x00000500 0x00000500 0x00106 0x00106 R E 0x100
 Section to Segment mapping:
  Segment Sections...
   00
   01     .text
The binary will look like the figure below in memory:
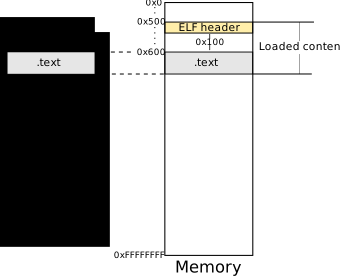
If we set the Offset of .text to
0x100 from the beginning of the file and its
VirtAddr to 0x600, when loading in memory, the
actual memory address of .text is
0x500+0x100=0x600; 0x500 is the memory
location where the bootloader loads the file into physical memory and
0x100 is the offset from the start of the ELF header to
.text. The entry address and the debug info will then take
the value 0x600 from the VirtAddr field above,
which totally matches the actual physical layout. The LOAD
segment itself starts at 0x500, with the ELF header, and
the PHDR segment at 0x534: the program header
table is in memory where the ELF header says it is, 0x34
bytes after the start of the file. We can do it by changing
os.lds as follows:
os/os.lds
ENTRY(main);

PHDRS
{
  /* The program header table itself must live inside a loadable segment,
     otherwise recent versions of ld refuse to link ("PHDR segment not
     covered by LOAD segment").  FILEHDR and PHDRS on the code segment
     tell ld to place the ELF header and the program headers at the start
     of that segment, which is also where the bootloader expects them. */
  headers PT_PHDR PHDRS;
  code PT_LOAD FILEHDR PHDRS;
}

SECTIONS
{
  .text 0x600 : ALIGN(0x100) { *(.text) } :code
  .data : { *(.data) } :code
  .bss  : { *(.bss) }  :code
  /DISCARD/ : { *(.eh_frame) *(.note.*) }
}
The ALIGN keyword, as it implies, tells the linker to
align a section, thus the segment containing it. However, for the
ALIGN keyword to have any effect, automatic alignment must
be disabled. Without it, the layout is the same as the first attempt,
except that .text is now at file offset
0x600:
Elf file type is EXEC (Executable file)
Entry point 0x600
There are 2 program headers, starting at offset 52
Program Headers:
  Type           Offset   VirtAddr   PhysAddr   FileSiz MemSiz  Flg Align
  PHDR           0x000034 0x00000034 0x00000034 0x00040 0x00040 R   0x4
  LOAD           0x000000 0x00000000 0x00000000 0x00606 0x00606 R E 0x1000
 Section to Segment mapping:
  Segment Sections...
   00
   01     .text
This is where the -N option that ld
suggested earlier comes in. According to man ld:
-N
--nmagic
    Turn off page alignment of sections, and disable linking against shared
    libraries.  If the output format supports Unix style magic numbers, mark the
    output as " NMAGIC"
That is, by default, each section is aligned by an operating system
page, which is 4096, or 0x1000 bytes in size.
The -N or -nmagic option disables this
behavior, which is needed. This is why the ld command in
os/Makefile shown earlier carries it:
os/Makefile
..... above content omitted ....
$(OS): $(OS_OBJS)
    ld -m elf_i386 -nmagic --no-warn-rwx-segments -T os.lds $(OS_OBJS) -o $@
Finally, we also need to update the top-level Makefile to write more than one sector into the disk image for the operating system binary, as its size exceeds one sector by far: the debug information takes most of the file.
$ ls -l build/os/os
-rwxr-xr-x 1 1000 1000 15232 Oct  9 04:30 build/os/os
In chapter 7 the dd command copied exactly one sector
with count=1. Without count, dd
copies the whole input file, however long it is, so the rule simply
drops the option:
Makefile
BUILD_DIR=build
BOOTLOADER=$(BUILD_DIR)/bootloader/bootloader.o
OS=$(BUILD_DIR)/os/os
DISK_IMG=$(BUILD_DIR)/disk.img

all: bootdisk

.PHONY: all bootloader os bootdisk qemu gdb clean test

bootloader:
    $(MAKE) -C bootloader

os:
    $(MAKE) -C os

bootdisk: bootloader os
    dd if=/dev/zero of=$(DISK_IMG) bs=512 count=2880 status=none
    dd conv=notrunc if=$(BOOTLOADER) of=$(DISK_IMG) bs=512 count=1 seek=0 status=none
    dd conv=notrunc if=$(OS) of=$(DISK_IMG) bs=512 seek=1 status=none

qemu: bootdisk
    qemu-system-i386 -machine q35 -drive format=raw,file=$(DISK_IMG),if=floppy -gdb tcp::26000 -S

gdb:
    gdb -q

clean:
    $(MAKE) -C bootloader clean
    $(MAKE) -C os clean
    rm -rf $(BUILD_DIR)

test: bootdisk
    ../../../tools/boot-test.sh $(DISK_IMG) 0x600 floppy
The OS variable now names the ELF file instead of
sample.o, and status=none keeps
dd from printing its statistics after every copy. The
bootloader reads 17 sectors, which covers the first 0x2200
bytes of the file; .text ends at offset 0x106,
so everything the LOAD segment needs is in memory, and the
debug information further down the file is never loaded.
gdb reads it from the file on disk, not from the memory of
the virtual machine.
After updating everything, we recompile the executable binary and get
the desired offset and virtual memory address of .text at
0x100 and 0x600, respectively:
$ make clean; make
$ readelf -l build/os/os

Elf file type is EXEC (Executable file)
Entry point 0x600
There are 2 program headers, starting at offset 52

Program Headers:
  Type           Offset   VirtAddr   PhysAddr   FileSiz MemSiz  Flg Align
  PHDR           0x000034 0x00000534 0x00000534 0x00040 0x00040 R   0x4
  LOAD           0x000000 0x00000500 0x00000500 0x00106 0x00106 R E 0x100

 Section to Segment mapping:
  Segment Sections...
   00
   01     .text
8.5.3 Testing the new binary
The .gdbinit file of chapter 7 gains two lines, so that
the symbols of the operating system are loaded and a breakpoint is set
at main every time gdb starts:
.gdbinit
define hook-stop
    # Translate the segment:offset into a physical address
    printf "[%4x:%4x] ", $cs, $eip
end
set architecture i8086
layout asm
layout reg
set disassembly-flavor intel
target remote localhost:26000
symbol-file build/os/os
b *0x7c00
b main
First, we start the QEMU machine:
$ make qemuIn another terminal, we start gdb, which loads the debug
info and sets the breakpoint at main:
$ gdbThe following output should be produced:
[f000:fff0] 0x0000fff0 in ?? ()
Breakpoint 1 at 0x7c00
Breakpoint 2 at 0x600: file main.c, line 1.
Then, let gdb run until it hits the main
function, then we change to the split layout between source and
assembly:
(gdb) layout splitThe final terminal output should look like this:
   ┘││ main.c│││││││││││││││││││││││││││││││││││││││││││││││││││││││┐
B+>─ 1       void main(){}                                        ─
   ─ 2                                                              ─
   ─ 3                                                              ─
   ─ 4                                                              ─
   ─ 5                                                              ─
   ─ 6                                                              ─
   ─ 7                                                              ─
   ─ 8                                                              ─
   ─ 9                                                              ─
   ─ 10                                                             ─
   ─ 11                                                             ─
   ─ 12                                                             ─
   ─ 13                                                             ─
   ─ 14                                                             ─
   ─ 15                                                             ─
   ─ 16                                                             ─
   └│││││││││││││││││││││││││││││││││││││││││││││││││││││││││││││││┌
B+>─ 0x600 <main>    push   ebp                                     ─
   ─ 0x601 <main+1>  mov    ebp,esp                                 ─
   ─ 0x603 <main+3>  nop                                            ─
   ─ 0x604 <main+4>  pop    ebp                                     ─
   ─ 0x605 <main+5>  ret                                            ─
   ─ 0x606           cmp    BYTE PTR [eax],al                       ─
   ─ 0x608           add    BYTE PTR [eax],al                       ─
   ─ 0x60a           add    al,0x0                                  ─
   ─ 0x60c           add    BYTE PTR [eax],al                       ─
   ─ 0x60e           add    BYTE PTR [eax],al                       ─
   ─ 0x610           add    al,0x1                                  ─
   ─ 0x612           retf                                           ─
   ─ 0x613           or     DWORD PTR [eax],eax                     ─
   ─ 0x615           add    BYTE PTR [edx+edx*4],cl                 ─
   ─ 0x618           add    DWORD PTR [eax],eax                     ─
   ─ 0x61a           add    BYTE PTR ds:0x12,al                     ─
   ─ 0x620           push   es                                      ─
   └│││││││││││││││││││││││││││││││││││││││││││││││││││││││││││││││┌
remote Thread 1 In: main                            L1    PC: 0x600
(gdb) c
Continuing.
[   0:7c00]
Breakpoint 1, 0x00007c00 in ?? ()
(gdb) c
Continuing.
[   0: 600]
Breakpoint 2, main () at main.c:1
(gdb) layout split
Now, the displayed assembly is the same as in objdump.
The first edition of this book showed 16-bit registers here
(push bp), because the CPU is still in 16-bit real mode;
recent versions of gdb follow the architecture reported by
the QEMU gdb stub and decode the bytes as 32-bit code, which is what
they were compiled as. To make sure, we verify the raw opcodes by using
the x command:
(gdb) x/16xb 0x600
0x600 <main>:   0x55    0x89    0xe5    0x90    0x5d    0xc3    0x38    0x00
0x608:  0x00    0x00    0x04    0x00    0x00    0x00    0x00    0x00
From the assembly window, main stops at the address
0x605. As such, the corresponding bytes from
0x600 to 0x605 are the first six of the output
of the command x/16xb 0x600. Then, the raw opcodes from the
objdump output:
$ objdump -z -M intel -S -D build/os/os | less
build/os/os:     file format elf32-i386


Disassembly of section .text:

00000600 <main>:
void main(){}
 600:   55                      push   ebp
 601:   89 e5                   mov    ebp,esp
 603:   90                      nop
 604:   5d                      pop    ebp
 605:   c3                      ret

Disassembly of section .debug_info:
...... output omitted ......
The raw opcodes displayed by the two programs are the same. In this
case, it proved that gdb correctly jumped to the address in
main for proper debugging. This is an extremely important
milestone. Being able to debug on bare metal will help tremendously in
writing an operating system, as a debugger allows a programmer to
inspect the internal state of a running machine at each step to verify
his code, step by step, to gradually build up a solid understanding.
Some professional programmers do not like debuggers, but it is because
they understand their domain deeply enough not to need to rely on a
debugger to verify their code. When encountering new domains, a debugger
is an indispensable learning tool because of its verifiability.
The same check can be run without a terminal, which is what the
test target of the Makefile does:
$ make test
....... output omitted ......
../../../tools/boot-test.sh build/disk.img 0x600 floppy
boot-test: ok, stopped at 0x600
The script tools/boot-test.sh starts QEMU with
-display none, so that no window opens, then runs
gdb in batch mode with the same commands we typed by hand:
connect to the stub, set a breakpoint at the given address, continue,
and print where the CPU stopped. It exits with a success status only if
the machine reached 0x600, our main. This is
the smoke test of chapter 0, and the continuous integration of the
book’s repository runs it for every chapter after every change, so that
the code never silently stops booting again.
However, even with the aid of a debugger, writing an operating system is still not a walk in the park. The debugger may give access to the machine at one point in time, but it does not give the cause. To find out the root cause is up to the ability of a programmer. Later in the book, we will learn how to use other debugging techniques, such as using the QEMU logging facility to debug CPU exceptions.
Exercise 8.2. Put .text back at
0x500 in os.lds, with
ALIGN(0x100) and -nmagic still in place, and
rebuild. Predict from the explanations in this chapter what
readelf -l build/os/os prints and where the bootloader will
jump, then check with gdb. Then run
ld -m elf_i386 --verbose and find, in the default linker
script, the line
. = SEGMENT_START("text-segment", 0x08048000) + SIZEOF_HEADERS;
that leaves room for the headers at the start of the first segment, and
check with readelf -l on the hello of chapter
0 that its first LOAD segment starts at file offset
0 and covers the PHDR segment: a hosted
program has had the arrangement we built by hand all along.
8.6 Check your understanding
In
main.o, thecall fooinstruction holdsfc ff ff ff, that is-4, and in the finalmainit holds07 00 00 00, althoughfoois0xcbytes after thecall. Explain both values.Modern
ldrefuses the scriptheaders PT_PHDR FILEHDR PHDRS; code PT_LOAD;with “PHDR segment not covered by LOAD segment”. What is aPT_PHDRentry for, why must it lie inside aPT_LOADsegment, and why does our kernel keep one although it has no dynamic linker?The first attempt put
.textat0x500and the bootloader, jumping throughe_entry, found the bytes7f 45 4c 46. What are they, why were they at0x500, and why was the debug information wrong at the same time?What does
-nmagicchange in the file thatldproduces, and why isALIGN(0x100)on.textuseless without it?The
LOADsegment of the kernel is0x106bytes long, yet the file is 15,232 bytes and the bootloader reads 17 sectors. What is in the rest of the file, why does it not matter that most of it is never loaded, and where doesgdbread it from?objcopy -O binaryturnsbootloader.o.elfinto the 512 bytes that go on the disk. What is lost in that step, why do we keep both files, and what is the difference betweensymbol-fileandadd-symbol-fileingdb?The CPU is still in 16-bit real mode when it reaches
main, which gcc compiled as 32-bit code. Why does themainof this chapter run anyway, and what would happen with amainthat stores a constant into a local variable?What does
-ffreestandingtell gcc that-nostdlibdoes not, and what goes wrong, on bare metal, the first time a function has a local array if-fno-stack-protectoris left out?
8.7 Milestone project: a kernel larger than 64 KiB
Part II ends with a loader that works and that will stop working the
day the kernel grows. Our bootloader reads 17 sectors into a buffer at
0x500 with one BIOS call, which is fine for a
main of six bytes and would be fine for a few dozen
kilobytes. This project asks you to find out exactly when it stops being
fine, and to fix it, with nothing but the tools of chapters 7 and 8.
Chapter 9 solves the same problem in its own bootloader, so do this
before reading it, and compare afterwards.
The task. Make the kernel bigger than 64 KiB, and
make the bootloader load all of it. For the size, add an initialized
array to os/main.c:
char pad[70000] = { [69999] = 0x42 };The initializer matters: an array of zeros goes to .bss,
which takes no space in the file (readelf -l would show it
as the difference between FileSiz and MemSiz),
and nothing would be loaded. With the array in .data,
readelf -l build/os/os shows a LOAD segment
with a FileSiz of 0x11290 bytes, and
nm build/os/os gives the address of pad. Then
modify bootloader/bootloader.asm, os/os.lds
and the Makefile until the kernel boots.
What makes it hard. Four things, each of which you
can verify in gdb:
Real-mode addressing. The BIOS writes to
ES:BX, andBXis 16 bits wide: a buffer longer than 64 KiB cannot be described with a fixedES, because the offset wraps around to 0 and the second half of the kernel lands on the first. The loader has to read in pieces and advanceESbetween them, by 32 paragraphs per sector (512 bytes divided by 16).What one call can do.
ALcannot exceed 128, the floppy DMA controller cannot cross a 64 KiB boundary of physical memory in one transfer (AH = 09h, exercise 7.4), and not every BIOS accepts a read that runs past the end of a track. Reading at most 64 sectors per call, 32 KiB, from a destination that is a multiple of 32 KiB, satisfies all three. This is the loop that chapter 9’s bootloader has, and that you build here yourself. On a floppy, every piece starts at a different cylinder, head and sector: the sector after 18 is sector 1 of head 1, and after that comes the next cylinder, so you need the arithmetic of section Floppy Disk Anatomy, withdiv, to turn a sector number into the three registers.Where the kernel lives. At
0x500, a kernel of 64 KiB would end at0x10500, on top of the bootloader at0x7c00(exercise 7.6 shows what happens then) and past the DMA boundary. The free conventional memory above the bootloader runs from0x7e00to0x9fc00, where the BIOS keeps its extended data area; the video memory starts at0xa0000, and chapter 12 shows the BIOS’s own map of all this. Load the kernel at0x10000, segment1000h, where the memory map ofcode/README.mdputs it for the rest of the book: that leaves more than 500 KiB, and.textmoves to0x10100inos.lds.The jump.
jmp [500h + 0x18]cannot be written for0x10018, since a 16-bit offset does not reach it, and the entry point in the header,0x10100, is a linear address that no 16-bitjmptakes either. Read it throughESinto a 32-bit register (a 386 executes 32-bit instructions in real mode), split it into a segment, the address divided by 16, and an offset, the remainder, and jump through a far pointer in memory.gdbthen reports[1010: 0]at the breakpoint, physical0x10100.
Success criterion. make test passes
with the address in the test target changed to the new
entry point, as printed by readelf -h build/os/os. At that
breakpoint, x/4xb 0x10000 shows 7f 45 4c 46,
and x/xb &pad[69999] shows 0x42:
p &pad[69999] gives an address more than 64 KiB past
the start of the file, and the byte is there only if the last piece was
read and put at the right place. Keep the kernel on the floppy: SeaBIOS
refuses the LBA read of chapter 9 on a floppy drive
(AH = 01h), so this is the CHS exercise it looks like.
Stretch goals. Switch to a hard-disk image and to
int 13h, AH = 42h, with the disk address packet of chapter
9, which removes the geometry arithmetic; the drive is
if=ide for QEMU and hda for
boot-test.sh. Print one dot per piece with the teletype
routine of exercise 7.2, and an E followed by
hlt if the carry flag is set after a call, so that a
failure is visible on the screen. Replace the hard-coded number of
sectors with a count computed from the kernel: either by the Makefile,
from the size of build/os/os passed to nasm
with -D (chapter 9 does this), or by the bootloader itself,
from the program header of the ELF file after the first sector is in
memory (chapter 5 gives the layout). With the last option, how many
sectors does the kernel really need?
When it does not boot. make test prints
the output of gdb when the breakpoint is not reached; the
rest is a make qemu and make gdb session. Set
a breakpoint after each int 0x13 and look at the carry flag
and at AH (p $eflags, p/x $eax),
at ES and CX, and at
x/4xb 0x10000: the magic number tells whether the first
piece arrived at all. If the breakpoint at main is never
hit, press Ctrl-C and read [cs:eip]: a CPU
executing zeros shows add BYTE PTR [eax],al on every line,
and $cs*16+$eip compared with the entry point in
readelf -h tells you whether the jump went to the wrong
place or to the right place that nobody loaded; a wrong split of the
entry into segment and offset gives the first, a piece read to the wrong
ES the second. Chapter 16 collects these techniques, and
more, in one place.
A
.relsection is equivalent to a list of items in the house analogy.↩︎The command for listing the symbol table is (assuming the object file is
main.o):readelf -s main.o↩︎.textholds program code and read-only data.↩︎The command for listing sections is (assuming the object file is
main.o):readelf -S main.o↩︎The command to compile
main.cinto the executablemain:gcc $BOOKFLAGS main.c -o main, thenreadelf -s main.↩︎Where the referenced memory address is to be fixed.↩︎
The end of an instruction is the memory address right after its last operand. The whole instruction
e8spans from the address10to the address14.↩︎Or any current assembler in use today.↩︎
To view the default script, use the
--verboseoption:ld --verbose↩︎Recall that sections are chunks of code or data, or both.↩︎
.ldsis the extension for linker scripts.↩︎The return address is above the current
ebp. However, when we entermain, no return address is pushed on the stack. So, whenretis executed, it simply retrieves any value aboveebpand uses it as a return address.↩︎As opposed to the object files, where memory addresses are always 0 and only assigned actual values in the linking process.↩︎
It is the
.commentsection. It can be viewed with the commandreadelf -p .comment main.↩︎The ones starting with the
.debugprefix.↩︎The symbol table and string tables.↩︎
Read-Only Memory.↩︎
The offset is the distance in bytes between the beginning of the file, the address 0, and the beginning address of a segment or a section.↩︎
All the outputs are produced by the command
readelf -l build/os/os, aftermake clean; make, with-nmagicleft out ofos/Makefile.↩︎