7 Bootloader
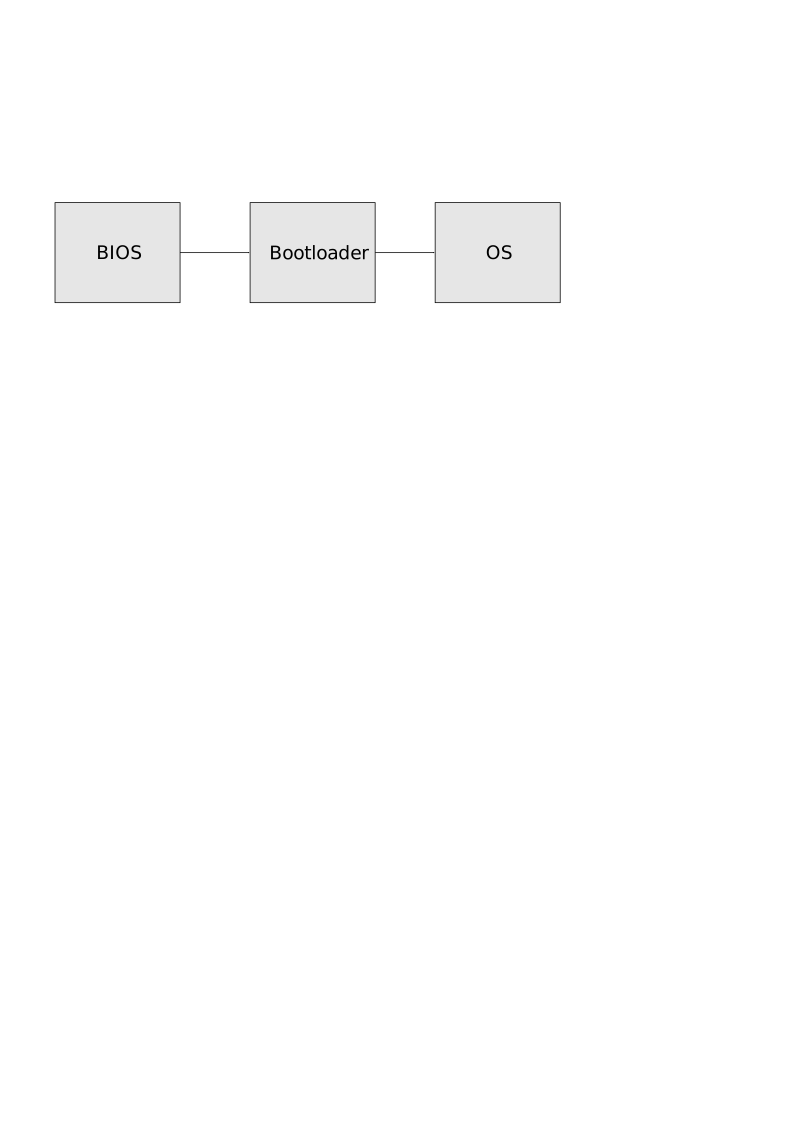
A bootloader loads an OS, or an application 1 that runs and communicates directly with hardware. To run an OS, the first thing to write is a bootloader. In this chapter, we are going to write a rudimentary bootloader, as our main focus is writing an operating system, not a bootloader. More interestingly, this chapter will present related tools and techniques that are applicable for writing a bootloader as well as an operating system.
Running this chapter’s code
The repository of the book contains the code of this chapter in
code/chapter7/os: the bootloader of section Read and load
sectors from a floppy disk, the sample program it loads, and the
Makefiles and .gdbinit of section Improve productivity with
scripts. The chapter builds all of it by hand first, so you do not need
the directory to follow along, but it is the fastest way to check your
setup and to compare with your own files when something does not work.
Every command runs in the container of chapter 0; from the top of the
repository:
$ docker run --rm --user "$(id -u):$(id -g)" --security-opt seccomp=unconfined -v "$PWD":/work -w /work/code/chapter7/os os01 makeassembles the bootloader and the sample program and writes
build/disk.img, a 1.44 MB floppy image with the bootloader
in the first sector and the sample program in the second. The same
command with make test in place of make boots
the image in QEMU without a display and runs
tools/boot-test.sh, which attaches gdb and
checks that the CPU reaches 0x500, the address the
bootloader jumps to once the sample program is loaded; it prints
boot-test: ok, stopped at 0x500. For an interactive
session, start two shells in the container with the -it
command of chapter 0 (or two terminals, if the tools are installed
natively), both in code/chapter7/os. In the first,
make qemu boots the image with the gdb stub on port 26000
and the machine stopped at its first instruction; in the second,
make gdb starts gdb, which the
.gdbinit of the directory connects to QEMU, with a
breakpoint at 0x7c00. make clean removes
build/.
7.1 x86 Boot Process
After the POST process finishes, the CPU’s program counter is set to
the address FFFF:0000h for executing BIOS code.
BIOS, Basic Input/Output System, is a firmware that
performs hardware initialization and provides a set of generic
subroutines to control input/output devices. The BIOS checks all
available storage devices (floppy disks and hard disks) to see if any
device is bootable, by examining whether the last two bytes of the first
sector hold the boot record signature 0x55,
0xAA. If so, the BIOS loads the first sector to the address
7C00h, sets the program counter to that address and lets
the CPU execute code from there.
The first sector is called the Master Boot Record, or MBR. The program in the first sector is called the MBR bootloader.
7.2 Using BIOS services
The BIOS provides many basic services for controlling the hardware at
the boot stage. A service is a group of routines that controls a
particular hardware device, or returns information about the current
system. Each service is given an interrupt number. To call a BIOS
routine, an int instruction must be used with an interrupt
number. Each BIOS service defines its own numbers for its routines; to
call a routine, a specific number must be written to a register required
by each service. The list of all BIOS interrupts is available in Ralf
Brown’s Interrupt List at: http://www.cs.cmu.edu/~ralf/files.html.
Example 7.1. Interrupt call 13h
(diskette service) requires the number of sectors to read, the track
number, the sector number, the head number and the drive number to read
from a storage device. The content of the sector is stored in memory at
the address defined by the pair of registers ES:BX. The
parameters are stored in registers like this:
; Store sector content in the buffer 10FF:0000
mov     dx, 10FFh
mov     es, dx
xor     bx, bx
mov     al, 2    ; read 2 sectors
mov     ch, 0    ; read track 0
mov     cl, 2    ; 2nd sector is read
mov     dh, 0    ; head number
mov     dl, 0    ; drive number. Drive 0 is floppy drive.
mov     ah, 0x02 ; read floppy sector function
int     0x13     ; call BIOS - Read the sector
The BIOS is only available in real mode. When switching to protected mode, the BIOS will not be usable anymore and the operating system code is responsible for controlling hardware devices. This is when the operating system stands on its own: it must provide its own kernel drivers for talking to hardware.
7.3 Boot process
BIOS transfers control to the MBR bootloader by jumping to
0000:7c00h, where the bootloader is assumed to exist already.Set up the machine environment for booting by properly initializing segment registers to enable the flat memory model.
Load the kernel:
- Read the kernel from disk.
- Save it somewhere in main memory.
- Jump to the starting code address of the kernel and execute.
If an error occurs, print a message to notify the user that something went wrong and halt.
7.4 Example Bootloader
Here is a simple bootloader that does nothing, except not crashing
the machine but halting it gracefully. If the virtual machine does not
halt but text repeatedly flashes, it means the bootloader did not load
properly and the machine crashed. The machine crashed because it keeps
executing until near the end of physical memory (1 MB in real mode),
which is FFFF:0000h, which starts the whole BIOS boot
process all over again. This is effectively a reset, but not fully,
since the machine environment from the previous run is still preserved.
For that reason, it is called a warm reboot. The opposite of a
warm reboot is a cold reboot, in which the machine environment
is reset to initial settings when the computer starts from a powerless
state.
bootloader.asm
;******************************************
; Bootloader.asm
; A Simple Bootloader
;******************************************
bits 16
start: jmp boot

;; constant and variable definitions
msg     db      "Welcome to My Operating System!", 0ah, 0dh, 0h

boot:
  cli   ; no interrupts
  cld   ; all that we need to init
  hlt   ; halt the system

  ; We have to be 512 bytes. Clear the rest of the bytes with 0
  times 510 - ($-$$) db 0
  dw 0xAA55                               ; Boot signature
The directive bits 16 tells nasm to
assemble 16-bit code, since the CPU starts in real mode. The string
msg is not used yet; it is a placeholder for the exercise
at the end of this section. The times directive pads the
file with zeroes up to byte 510, so that the signature
0xAA55 lands exactly on the last two bytes of the sector.
Note that dw 0xAA55 writes the bytes 55 AA in
memory, since x86 is little-endian.
7.5 Compile and load
We compile the code with nasm into a flat binary, with
no file header at all, since the BIOS copies the sector to memory byte
for byte:
$ nasm -f bin bootloader.asm -o bootloaderThen, we create a 1.4 MB floppy disk:
$ dd if=/dev/zero of=disk.img bs=512 count=2880
2880+0 records in
2880+0 records out
1474560 bytes (1.5 MB, 1.4 MiB) copied, 0.00278707 s, 529 MB/s
Then, we write the bootloader to the 1st sector:
$ dd conv=notrunc if=bootloader of=disk.img bs=512 count=1 seek=0
1+0 records in
1+0 records out
512 bytes copied, 1.4046e-05 s, 36.5 MB/s
The option conv=notrunc preserves the original size of
the floppy disk. Without this option, the 1.4 MB disk image would be
completely replaced by a new disk.img of only 512 bytes,
and we do not want that. We can verify the result with hd
(or hexdump -C, which prints the same thing): the first
sector starts with our jmp (eb 22) and the
string, and ends with the signature at offset 0x1fe:
$ hd disk.img
00000000  eb 22 57 65 6c 63 6f 6d  65 20 74 6f 20 4d 79 20  |."Welcome to My |
00000010  4f 70 65 72 61 74 69 6e  67 20 53 79 73 74 65 6d  |Operating System|
00000020  21 0a 0d 00 fa fc f4 00  00 00 00 00 00 00 00 00  |!...............|
00000030  00 00 00 00 00 00 00 00  00 00 00 00 00 00 00 00  |................|
*
000001f0  00 00 00 00 00 00 00 00  00 00 00 00 00 00 55 aa  |..............U.|
00000200  00 00 00 00 00 00 00 00  00 00 00 00 00 00 00 00  |................|
*
00168000
In the past, developing an operating system was complicated because a programmer needed to understand the specific hardware he was using. Even though x86 was ubiquitous, the minute differences between models made some code written for a machine not run on another. Further, if you use the same physical computer you write your operating system on, it takes very long between runs, and it is also difficult to debug. Fortunately, today we can uniformly produce a virtual machine with a particular specification and avoid the incompatibility issue altogether, thus making an OS easier to write and test since everyone can reproduce the same machine environment.
We will be using QEMU, a generic and open source machine
emulator and virtualizer. QEMU can emulate various types of machine, not
limited to x86_64 only. Debugging is easy since you can connect GDB to a
virtual machine to debug code that runs on it, through QEMU’s built-in
GDB server. QEMU can use disk.img as a boot device e.g. a
floppy disk:
$ qemu-system-i386 -machine q35 -drive format=raw,file=disk.img,if=floppy -gdb tcp::26000 -SWith option
-machine q35, QEMU emulates aq35machine model from Intel 2.With option
-drive format=raw,file=disk.img,if=floppy, QEMU usesdisk.imgas a floppy disk image. Older documentation (and the first edition of this book) spells this-fda disk.img;if=floppyis the explicit form of-fda. Theformat=rawpart is new: a recent QEMU inspects an image whose format is not stated, guessesraw, and prints a warning that the guess is dangerous and that writes to the first block will be restricted. Stating the format silences the warning and the restriction.With option
-gdb tcp::26000, QEMU allowsgdbto connect to the virtual machine for remote debugging through a TCP socket on port 26000.With option
-S, QEMU waits forgdbto connect before it starts running.
After the command is executed, a new console window appears that
displays the screen output of the virtual machine. Open another
terminal, run gdb and set the current architecture to
i8086, since we are running in 16-bit mode:
(gdb) set architecture i8086
warning: A handler for the OS ABI "GNU/Linux" is not built into this configuration
of GDB.  Attempting to continue with the default i8086 settings.

The target architecture is set to "i8086".
Then, connect gdb to the waiting virtual machine with
this command:
(gdb) target remote localhost:26000
Remote debugging using localhost:26000
warning: No executable has been specified and target does not support
determining executable automatically.  Try using the "file" command.
0x0000fff0 in ?? ()
The two warnings are harmless: there is no operating system on the
machine, so there is no executable file for gdb to load
symbols from. The CPU is stopped at 0xfff0, the offset part
of FFFF:0000h, the first instruction the BIOS executes.
Then, place a breakpoint at 0x7c00:
(gdb) b *0x7c00
Breakpoint 1 at 0x7c00
Note the asterisk before the memory address. Without the asterisk,
gdb treats the address as a symbol in a program rather than
an address. Then, for convenience, we use a split layout for viewing the
assembly code and registers together:
(gdb) layout asm
(gdb) layout reg
Finally, run the program:
(gdb) c
Continuing.

Breakpoint 1, 0x00007c00 in ?? ()
The BIOS has loaded our sector and jumped to it. We can check that
the bytes at 0x7c00 are the ones hd showed us
in the file, and ask gdb to disassemble them, in the Intel
syntax used throughout this book:
(gdb) x/8xb $cs*16+$eip
0x7c00: 0xeb    0x22    0x57    0x65    0x6c    0x63    0x6f    0x6d
(gdb) set disassembly-flavor intel
(gdb) x/3i $cs*16+$eip
=> 0x7c00:  jmp    0x7c24
   0x7c02:  push   edi
   0x7c03:  gs ins BYTE PTR es:[edi],dx
The first instruction is our jmp boot, and the
“instructions” after it are the bytes of the string
"Welcome..." decoded as if they were code, which is
expected: gdb has no way to know where code ends and data
begins. The expression $cs*16+$eip computes the physical
address from the segment and offset, as described in chapter 3; in this
case cs is 0, so it is simply
0x7c00. It is worth looking at the segment registers once,
since the BIOS has just handed us the machine in whatever state its own
code left it:
(gdb) info registers eip cs ds es ss esp
eip            0x7c00              0x7c00
cs             0x0                 0
ds             0x0                 0
es             0x0                 0
ss             0x0                 0
esp            0x6f08              0x6f08
All segments are zero and the stack is somewhere below our code; both facts will matter in a moment. If the virtual machine successfully runs the bootloader, the QEMU screen shows the messages of the BIOS, SeaBIOS, followed by a blinking cursor:
SeaBIOS (version 1.16.3-debian-1.16.3-2)


iPXE (https://ipxe.org) 00:02.0 CA00 PCI2.10 PnP PMM+06FC6DE0+06F06DE0 CA00


Booting from Hard Disk...
Boot failed: could not read the boot disk

Booting from Floppy...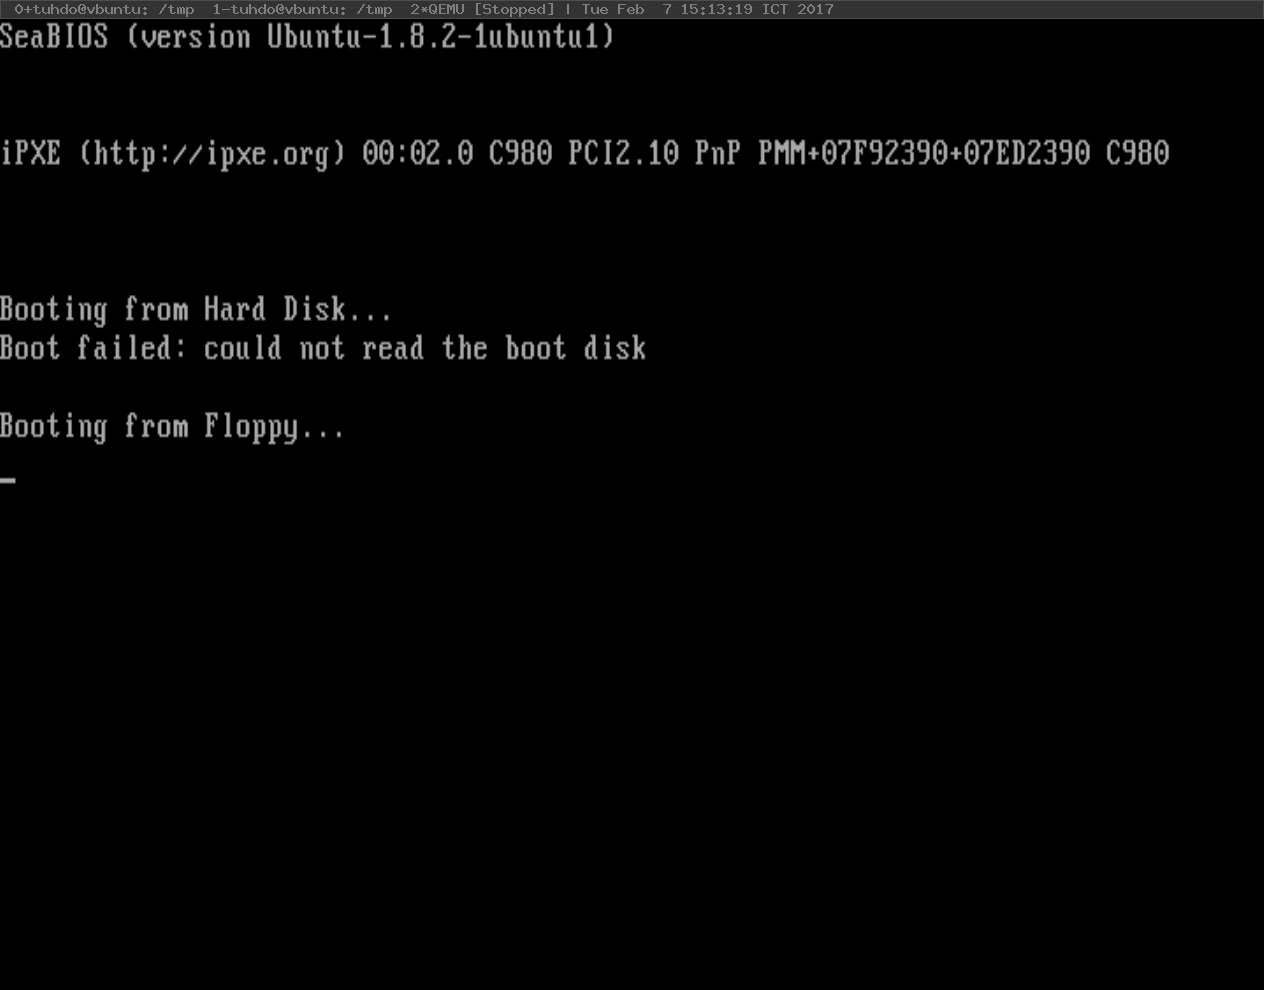
Do not be alarmed by the line
Boot failed: could not read the boot disk: SeaBIOS tries
the hard disk first, and our virtual machine has none, so it moves on to
the floppy drive. The iPXE line is the network boot
firmware announcing itself; it is only used when every disk fails. The
versions printed on your screen depend on your QEMU, and the screenshot
above was taken with an older one, but the sequence of messages is the
same.
7.5.1 Debugging
If, for some reason, the sample bootloader cannot get to such a
screen and gdb does not stop at 0x7c00, then
the following scenarios are likely:
The bootloader is invalid: the message “Boot failed: not a bootable disk” appears after “Booting from Floppy…”, and SeaBIOS goes on to try the CD-ROM and then the network through iPXE:
Booting from Floppy...
Boot failed: not a bootable disk

Booting from DVD/CD...
Boot failed: Could not read from CDROM (code 0003)
Booting from ROM...
iPXE (PCI 00:02.0) starting execution...ok
Make sure the boot signature is at the last 2 bytes of the 512-byte first sector.
The machine cannot find a boot disk: the same message appears, since an empty sector has no signature either. Make sure the bootloader is correctly written to the first sector. It can be verified by checking the disk with
hd:$ hd disk.img | lessIf the first 512 bytes are all zeroes, then it is likely that the bootloader was written to another sector.
The machine crashes: when such a scenario happens, it resets back to the beginning at
FFFF:0000h. If the QEMU machine starts without waiting forgdb, then the console output window keeps flashing as the machine is repeatedly reset. It is likely that some instruction in the bootloader code is causing the fault.
A warning about gdb and 16-bit code. The
gdb in our container (version 16) disassembles the
bootloader as 32-bit code even after
set architecture i8086, because QEMU describes the CPU to
gdb as a 32-bit target and that description wins over our
setting. You saw it above: the byte 57
(push di in 16-bit code) was printed as
push edi, and you will see worse in the next bootloader:
mov ax, 50h followed by mov es, ax (bytes
b8 50 00 8e c0) is printed as a single
mov eax,0xc08e0050, because a 32-bit mov eax
takes a 4-byte immediate and swallows the next instruction. The bytes in
memory are right; only the mnemonics are wrong. When a listing looks
suspicious, read the bytes instead with x/8xb $cs*16+$eip
and compare them with the output of hd or with the listing
file that nasm -l bootloader.lst produces; try it now on
0x7c24, where you should find fa fc f4, that
is cli, cld, hlt. Breakpoints,
single-stepping and the registers are unaffected, and the 32-bit kernel
of chapter 8 is disassembled correctly.
7.5.2 Two traps when writing a bootloader
Before you write your own bootloader, you need to know about two mistakes almost every beginner makes. Both are reported by readers of the first edition of this book, and both produce the same symptom: the code assembles fine, the BIOS runs it, and nothing appears on screen, or the machine jumps somewhere random.
The first trap is addresses. Our bootloader is
assembled with nasm -f bin, a flat binary where the first
byte of the file is at offset 0. When msg is defined at
byte 2 of the file, an instruction such as mov si, msg is
assembled with the immediate value 2:
$ hd bootloader | sed -n '3p'
00000020 21 0a 0d 00 fa fc be 02 00 ac 08 c0 74 06 b4 0e |!...........t...|(be 02 00 is mov si, 0x0002.) But the BIOS
loads the sector at 0x7c00, so at run time the string is at
0x7c02, and ds:si points at
0000:0002, which is in the BIOS interrupt vector table and
happens to contain a zero byte: a printing loop stops immediately, and
the string never appears. The fix is to tell nasm where the
code will live, with the org directive at the top of the
file:
org 0x7c00
bits 16
Now every label is computed relative to 0x7c00, and the
same instruction assembles to be 02 7c, that is
mov si, 0x7c02. The bootloaders printed in this chapter
never read msg, which is why they get away without
org; yours will not. The second half of the fix is the
segment registers: ds:si means that ds is
added to the address, and the BIOS makes no promise about the value of
ds when it jumps to 0x7c00. SeaBIOS leaves it
at zero, which is what org 0x7c00 assumes, but a bootloader
should not depend on it. Set the segments yourself, right after
cli:
  xor ax, ax
  mov ds, ax
  mov es, ax
(The other consistent choice, org 0 with all segments
set to 0x7c0, also works; what matters is that
org and the segments agree.) You can check what the CPU
actually sees with gdb: stop at the first
lodsb and compare x/s $ds*16+$si with
x/s 0x7c02. Without org the first prints an
empty string and the second prints the message.
The second trap is the stack. call,
ret, push, pop and
int all use the stack through ss:sp, and the
BIOS leaves ss:sp wherever it happened to be when it
finished its own work (0000:6f08 under SeaBIOS, as
info registers showed us above). Set up your own stack
before the first call, in an area that is free: for example
mov ax, 0; mov ss, ax; mov sp, 0x7c00, which grows down
from just below the bootloader. A related mistake reported by a reader
is to end a routine with leave followed by
ret, as a C compiler does. leave is
mov sp, bp followed by pop bp; without a
matching push bp; mov bp, sp at the start of the routine,
it loads sp from whatever bp contains, and the
following ret pops a return address from the wrong place
and jumps to it. The reader saw the program counter go from
0x7c28 to a random address right after a character was
printed. In assembly code without a stack frame, ret alone
is correct.
Exercise 7.1. Print a welcome message
We loaded the bootloader successfully. But, it needs to do something
useful other than halting our machine. The easiest thing to do is
printing something on screen, like how an introduction to any
programming language starts with “Hello World”. Our bootloader prints
“Welcome to my operating system” 3. In this part, we will
build a simple I/O library that allows us to set a cursor anywhere on
the screen and print text there. The routines you need are in the video
service, interrupt 10h: AH = 02h sets the
cursor position, AH = 09h writes a character and attribute
at the cursor, and AH = 0Eh writes a character in teletype
mode, advancing the cursor. Look them up in Ralf Brown’s Interrupt
List.
First, create a file io.asm for I/O related routines. Then, write the following routines:
MovCursorPurpose: Move a cursor to a specific location on screen and remember this location. Parameters:
bh= Y coordinatebl= X coordinate Return: None
PutCharPurpose: Print a character on screen, at the cursor position previously set by
MovCursor. Parameters:al= Character to printbl= text colorcx= number of times the character is repeated Return: None
PrintPurpose: Print a string. Parameters:
ds:si= Zero terminated string Return: None
Test the routines by putting each in the bootloader source, compile
and run. To debug, run GDB and set a breakpoint at a specific routine.
The end result is that Print should display a welcome
message on screen. If nothing appears, reread the two traps above before
anything else.
7.6 Loading a program from bootloader
Now that we get the feel of how to use the BIOS services, it is time for something more complicated. We will place our kernel on the 2nd sector onward, and our bootloader reads a fixed number of sectors starting from the 2nd sector. The sample program below fits in one sector, but our kernel will grow gradually, so reading a few more sectors than needed saves us from modifying the bootloader each time the kernel size expands by another sector.
The primary responsibility of a bootloader is to read an operating system from some storage device e.g. a hard disk, then load it into main memory and transfer the control to the loaded operating system, similar to how the BIOS reads and loads a bootloader. At the moment, our bootloader does nothing more than an assembly program loaded by the BIOS. To make our bootloader a real one, it must perform well the above two tasks: read and load an operating system.
7.6.1 Floppy Disk Anatomy
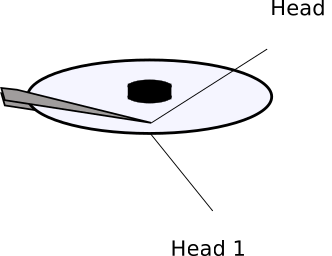
To read from a storage device, we must understand how the device works, and the interface provided for controlling it. First of all, a floppy disk is a storage device, similar to RAM, but it can store information even when a computer is turned off, thus it is called a persistent storage device. A floppy disk provides a storage space of up to 1.4 MB, or 1,474,560 bytes. When reading from a floppy disk, the smallest unit that can be read is a sector, a group of 512 contiguous bytes. A group of 18 sectors is a track. Each side of a floppy disk consists of 80 tracks. A floppy drive is required to read a floppy disk. Inside a floppy drive is an arm with 2 heads, each head reads one side of a floppy disk: head 0 reads and writes the upper side and head 1 the lower side.
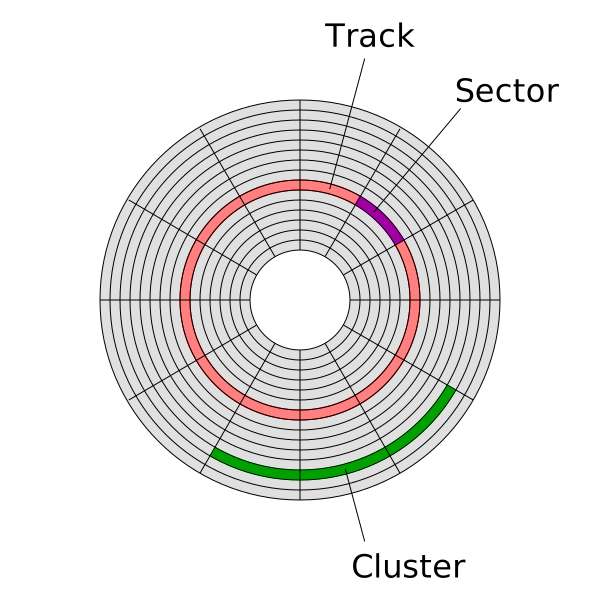
When a floppy drive writes data to a brand new floppy disk, track 0
on the upper side is written first, by head 0. When the upper track 0 is
full, the lower track 0 is used by head 1. When both the upper and lower
sides of track 0 are full, it goes back to head 0 for writing data
again, but this time on the upper side of track 1, and so on, until no
space is left on the device. The same procedure is also applied for
reading data from a floppy disk. A position on the disk is therefore a
triple (cylinder, head, sector), where a cylinder is the set of
tracks with the same number on every side; this is the CHS
addressing used by the BIOS routine below. Do the arithmetic once:
80 cylinders × 2 heads × 18 sectors × 512 bytes = 1,474,560 bytes, the
size of our disk.img.
7.6.2 Read and load sectors from a floppy disk
First, we need a sample program to write into the 2nd sector, so we can experiment with floppy disk reading:
sample.asm
;******************************************
; sample.asm
; A Sample Program
;******************************************
mov eax, 1
add eax, 1
Such a program is good enough. To simplify and for the purpose of
demonstration, we will use the same floppy disk that holds the
bootloader to hold our operating system. The operating system image
starts from the 2nd sector, as the 1st sector is
already in use by the bootloader. We compile it and write it to the
2nd sector with dd, again with
conv=notrunc so that the image keeps its size:
$ nasm -f bin sample.asm -o sample
$ dd conv=notrunc if=sample of=disk.img bs=512 count=1 seek=1
0+1 records in
0+1 records out
10 bytes copied, 1.1712e-05 s, 854 kB/s| 1st sector | 2nd sector | ….. | 30th sector |
|---|---|---|---|
bootloader |
sample |
…. | (empty) |
Next, we need to fix the bootloader for reading from the floppy disk
and loading an arbitrary number of sectors. Before doing so, a basic
understanding of the floppy disk routine is required. To read data from
disk, interrupt 13h with AH = 02h is the
routine for reading sectors from disk into memory:
AH = 02
AL = number of sectors to read (1-128 dec.)
CH = track/cylinder number (0-1023 dec., see below)
CL = sector number (1-17 dec.)
DH = head number (0-15 dec.)
DL = drive number (0=A:, 1=2nd floppy, 80h=drive 0, 81h=drive 1)
ES:BX = pointer to buffer
Return:
   AH = status (see INT 13,STATUS)
   AL = number of sectors read
   CF = 0 if successful
      = 1 if error
Applying the above routine, the bootloader can read the 2nd sector:
bootloader.asm
;******************************************
; Bootloader.asm
; A Simple Bootloader
;******************************************
bits 16
start: jmp boot

;; constant and variable definitions
msg     db      "Welcome to My Operating System!", 0ah, 0dh, 0h

boot:
  cli   ; no interrupts
  cld   ; all that we need to init

  mov           ax, 50h

  ; ;; set the buffer
        mov     es, ax
        xor     bx, bx

  mov   al, 2                                         ; read 2 sector
        mov     ch, 0                                         ; we are reading the second sector past us, so it is still on track 0
        mov     cl, 2                                         ; sector to read (The second sector)
        mov     dh, 0                                         ; head number
        mov     dl, 0                                         ; drive number. Remember Drive 0 is floppy drive.

  mov   ah, 0x02                              ; read floppy sector function
        int     0x13                                          ; call BIOS - Read the sector
  jmp 0x50:0x0                                  ; jump and execute the sector!

  hlt   ; halt the system

  ; We have to be 512 bytes. Clear the rest of the bytes with 0
  times 510 - ($-$$) db 0
  dw 0xAA55                               ; Boot signature
The above code jumps to the address 0x50:00 (which is
0x500). To test the code, load it on a QEMU virtual machine
and connect through gdb, then place a breakpoint at
0x500:
(gdb) b *0x500
Breakpoint 2 at 0x500
(gdb) c
Continuing.

Program received signal SIGTRAP, Trace/breakpoint trap.
0x00000000 in ?? ()
(gdb) info registers eip cs es
eip            0x0                 0x0
cs             0x50                80
es             0x50                80
(gdb) x/10xb $cs*16+$eip
0x500:  0x66    0xb8    0x01    0x00    0x00    0x00    0x66    0x83
0x508:  0xc0    0x01
We are at 0x500, but gdb does not say so:
the far jump loaded cs with 0x50 and
eip with 0, and gdb computes
addresses from eip alone, so it reports a stop at
0x0 and a generic SIGTRAP instead of
Breakpoint 2. This is the same segment-and-offset
arithmetic as in chapter 3, and it is why we always write
$cs*16+$eip and why the gdb script at the end
of this chapter prints cs:eip at every stop. The bytes are
those of sample: 66 b8 01 00 00 00 is
mov eax, 1, where 66 is the operand-size
prefix that nasm must emit to use a 32-bit register in
16-bit code, and 66 83 c0 01 is add eax, 1.
(The disassembly shows them as mov ax,0x1 and
add BYTE PTR [eax],al, the 16-bit quirk of the warning box
above: gdb decodes 32-bit code, where the same prefix means
the opposite.) If gdb stops at the address, with the same
bytes as in sample, then the bootloader successfully loaded
the program. This is an important milestone, as we have ensured that our
operating system is loaded and runs properly.
7.7 Improve productivity with scripts
7.7.1 Automate build with GNU Make
Up to this point, the whole development process has felt repetitive:
whenever a change is made, the same commands are entered again. The
commands are also complex. Ctrl+r helps, but it still feels
tedious.
GNU Make is a program that controls and automates the process of
building complex software. For a small program, like a single C source
file, invoking gcc is quick and easy. However, soon your
software will be more complex, with multiple files spanning multiple
directories, and it is a chore to manually build and link files. To
solve such a problem, a tool was created to automate away this problem
and is called a build system. GNU Make is one such tool. There
are various build systems out there, but GNU Make is the most popular in
the Linux world, as it is used for building the Linux kernel.
For a comprehensive introduction to make, please refer to the official Introduction to Make: https://www.gnu.org/software/make/manual/html_node/Introduction.html#Introduction. And that’s enough for our project. You can also download the manual in different formats e.g. PDF from the official manual page: https://www.gnu.org/software/make/manual/.
With a Makefile, we can build with simpler commands and save time:
Makefile
all: bootdisk

bootloader:
    nasm -f bin bootloader.asm -o bootloader.o

kernel:
    nasm -f bin sample.asm -o sample.o

bootdisk: bootloader kernel
    dd if=/dev/zero of=disk.img bs=512 count=2880
    dd conv=notrunc if=bootloader.o of=disk.img bs=512 count=1 seek=0
    dd conv=notrunc if=sample.o of=disk.img bs=512 count=1 seek=1
Each line that starts with a tab is a command, and make
requires a tab there, not spaces. Now, with a single command, we can
build from start to finish a disk image with a bootloader at the
1st sector and the sample program at the 2nd
sector:
$ make bootdisk
nasm -f bin bootloader.asm -o bootloader.o
nasm -f bin sample.asm -o sample.o
dd if=/dev/zero of=disk.img bs=512 count=2880
2880+0 records in
2880+0 records out
1474560 bytes (1.5 MB, 1.4 MiB) copied, 0.00298677 s, 494 MB/s
dd conv=notrunc if=bootloader.o of=disk.img bs=512 count=1 seek=0
1+0 records in
1+0 records out
512 bytes copied, 1.3165e-05 s, 38.9 MB/s
dd conv=notrunc if=sample.o of=disk.img bs=512 count=1 seek=1
0+1 records in
0+1 records out
10 bytes copied, 1.1712e-05 s, 854 kB/s
Looking at the Makefile, we can see a few problems:
First, the name disk.img is all over the place. When we
want to change the disk image name e.g. floppy_disk.img,
all the places with the name disk.img must be changed
manually. To solve this problem, we use a variable, and every appearance
of disk.img is replaced with a reference to the variable.
This way, only one place is changed, the variable definition, and all
other places are updated automatically. The following variables are
added:
BOOTLOADER=bootloader.o
OS=sample.o
DISK_IMG=disk.img
The second problem is, the names bootloader and
sample appear as part of the filenames of the source files
e.g. bootloader.asm and sample.asm, as well as
the filenames of the binary files e.g. bootloader.o and
sample.o. Similar to disk.img, when a name
changes, every reference to that name must also be changed manually for
both the names of the source files and the names of the binary files
e.g. if we change bootloader.asm to
loader.asm, then the object file bootloader.o
needs changing to loader.o. To solve this problem, instead
of changing filenames manually, we create a rule that automatically
generates the filenames of one extension from another. In this case, we
want any source file that ends with .asm to have its
equivalent binary file with the extension .o
e.g. bootloader.asm → bootloader.o. Such a
transformation is common, so GNU Make provides built-in functions,
wildcard and patsubst, for solving such
problems:
SRCS := $(wildcard *.asm)
OBJS := $(patsubst %.asm, %.o, $(SRCS))
wildcard matches any .asm file in the
current directory, then the list of matched files is assigned to the
variable SRCS. In this case, SRCS is assigned
the value:
bootloader.asm sample.asmpatsubst substitutes any filename ending with
.asm into a filename ending with .o
e.g. bootloader.asm → bootloader.o. After
patsubst runs, we get a list of object files in
OBJS:
bootloader.o sample.oFinally, a recipe for building from .asm to
.o is needed:
%.o: %.asm
nasm -f bin $< -o $@$<is a special variable that refers to the input of the recipe:%.asm.$@is a special variable that refers to the output of the recipe:%.o.
When the recipe is executed, the variables are replaced with the
actual values. For example, if a transformation is
bootloader.asm → bootloader.o, then the actual
command executed after replacing the placeholders in the recipe is:
nasm -f bin bootloader.asm -o bootloader.oWith the recipe, all the .asm files are built
automatically with the nasm command into .o
files and we no longer need a separate recipe for each object file.
Putting it all together with the new variables, we get a better
Makefile:
Makefile
BOOTLOADER=bootloader.o
OS=sample.o
DISK_IMG=disk.img

SRCS := $(wildcard *.asm)
OBJS := $(patsubst %.asm, %.o, $(SRCS))

all: bootdisk

%.o: %.asm
    nasm -f bin $< -o $@

bootdisk: $(OBJS)
    dd if=/dev/zero of=$(DISK_IMG) bs=512 count=2880
    dd conv=notrunc if=$(BOOTLOADER) of=$(DISK_IMG) bs=512 count=1 seek=0
    dd conv=notrunc if=$(OS) of=$(DISK_IMG) bs=512 count=1 seek=1
From here on, any .asm file is compiled automatically,
without an explicit recipe for each file. There is a second benefit:
bootloader.o is now a real file that make can
compare with bootloader.asm, so running make a
second time without changing the sources skips the two nasm
commands and only rebuilds the disk image.
The object files are in the same directory as the source files, making it more difficult to work with the source tree. Ideally, object files and source files should live in different directories. We want a better organized directory layout like this one:
.
├── bootloader
│   ├── bootloader.asm
│   └── Makefile
├── build
│   ├── bootloader
│   │   └── bootloader.o
│   ├── disk.img
│   └── os
│       └── sample.o
├── Makefile
└── os
    ├── Makefile
    └── sample.asm
The bootloader/ directory holds the bootloader source
files; os/ holds the operating system source files that we
are going to write later; build/ holds the object files for
both the bootloader and the OS, and the final disk image
disk.img. Everything under build/ is
generated, so it is the only directory that needs cleaning and the only
one to leave out of version control. Notice that the
bootloader/ directory also has its own Makefile. This
Makefile will be responsible for building everything in the
bootloader/ directory, while the top-level Makefile is
released from the burden of building the bootloader, and only builds the
disk image. The content of the Makefile in the bootloader/
directory is:
bootloader/Makefile
BUILD_DIR=../build/bootloader

SRCS := $(wildcard *.asm)
OBJS := $(patsubst %.asm, $(BUILD_DIR)/%.o, $(SRCS))

all: $(OBJS)

$(BUILD_DIR)/%.o: %.asm
    mkdir -p $(BUILD_DIR)
    nasm -f bin $< -o $@

clean:
    rm -rf $(BUILD_DIR)
Basically everything related to the bootloader in the top-level
Makefile is extracted into this Makefile. When make runs
this Makefile, bootloader.o is built and put into the
../build/bootloader/ directory. As a good practice, all
references to ../build/ go through the
BUILD_DIR variable. The recipe for transforming from
.asm → .o is also updated with proper paths,
else it will not work:
%.asmrefers to the assembly source files in the current directory.$(BUILD_DIR)/%.orefers to the output object files in the build directory at the path../build/bootloader/.
The entire recipe implements the transformation from
<source_file.asm> →
../build/bootloader/<object_file.o>. Note that all
paths must be correct. If we try to build object files in a different
directory e.g. the current directory, it will not work since no recipe
exists to build objects at such a path.
The recipe has gained a line: mkdir -p $(BUILD_DIR).
nasm writes its output into the directory named by
-o but does not create that directory, and after a fresh
checkout, or after make clean,
../build/bootloader/ does not exist. The -p
option makes mkdir create the missing parent directories
too, and, just as important, makes it succeed silently when the
directory already exists; without -p, the second build
would fail on “File exists”. The clean target removes the
whole build directory of this component with rm -rf, which
also does not complain when there is nothing to remove.
We also create a similar Makefile for the os/
directory:
os/Makefile
BUILD_DIR=../build/os

SRCS := $(wildcard *.asm)
OBJS := $(patsubst %.asm, $(BUILD_DIR)/%.o, $(SRCS))

all: $(OBJS)

$(BUILD_DIR)/%.o: %.asm
    mkdir -p $(BUILD_DIR)
    nasm -f bin $< -o $@

clean:
    rm -rf $(BUILD_DIR)
For now, it looks identical to the Makefile for the bootloader,
except for BUILD_DIR. In the next chapter, we will update
it for C code. Then, we update the top-level Makefile:
Makefile
BUILD_DIR=build
BOOTLOADER=$(BUILD_DIR)/bootloader/bootloader.o
OS=$(BUILD_DIR)/os/sample.o
DISK_IMG=$(BUILD_DIR)/disk.img

all: bootdisk

.PHONY: all bootloader os bootdisk qemu gdb clean test

bootloader:
    $(MAKE) -C bootloader

os:
    $(MAKE) -C os

bootdisk: bootloader os
    dd if=/dev/zero of=$(DISK_IMG) bs=512 count=2880 status=none
    dd conv=notrunc if=$(BOOTLOADER) of=$(DISK_IMG) bs=512 count=1 seek=0 status=none
    dd conv=notrunc if=$(OS) of=$(DISK_IMG) bs=512 count=1 seek=1 status=none

qemu: bootdisk
    qemu-system-i386 -machine q35 -drive format=raw,file=$(DISK_IMG),if=floppy -gdb tcp::26000 -S

gdb:
    gdb -q

clean:
    $(MAKE) -C bootloader clean
    $(MAKE) -C os clean
    rm -rf $(BUILD_DIR)

test: bootdisk
    ../../../tools/boot-test.sh $(DISK_IMG) 0x500 floppy
The build process is now truly modularized:
The
bootloaderandosbuilds are now delegated to the child Makefile of the respective component. The-Coption tellsmaketo execute with the Makefile in the supplied directory. In this case, the directories arebootloader/andos/. The child is invoked as$(MAKE)rather thanmake:MAKEis a variable that always holds the name of themakeprogram that is currently running, so a parallel build (make -j) or a differently namedmakeis passed on to the children correctly.The target
allof the top-level Makefile is only responsible for thebootdisktarget, which is the primary target of this Makefile.The disk image lives in
build/, like every other generated file, soDISK_IMGis defined relative toBUILD_DIR(the first edition put it in the project root, which contradicted the layout above; a reader reported it).The three
ddcommands carrystatus=none.ddreports the number of records it copied, as we saw earlier; once the commands are known to work, that report is noise that drowns the one line we care about when something fails.status=nonekeepsddsilent except for errors.
In many cases, a target is not a filename, but just a name for a
recipe to be executed whenever requested. If a file has the same name as
a target and the file is up-to-date, make does not execute
the target. This is exactly what would happen here:
bootloader and os are directory names, which
exist and are always “up to date”. To solve this problem,
.PHONY specifies that some targets are not files. All phony
targets will then run when requested, regardless of files of the same
names.
To save time entering the command for starting up a QEMU virtual
machine, the top-level Makefile has a qemu target. It
depends on bootdisk, so make qemu rebuilds
whatever changed before booting; there is no way to boot a stale image
by mistake. The gdb target, gdb -q, is there
for symmetry: it starts gdb in the project directory, where
the .gdbinit file of the next section does the rest
(-q only suppresses the copyright banner).
Project cleaning is delegated the same way as building. The Makefile
of each component takes care of its own object files, then the top-level
clean calls the component Makefiles and finally removes
build/ altogether, disk image included. Invoking
make clean at the project root removes every generated
file:
$ make clean
make -C bootloader clean
make[1]: Entering directory '/work/code/chapter7/os/bootloader'
rm -rf ../build/bootloader
make[1]: Leaving directory '/work/code/chapter7/os/bootloader'
make -C os clean
make[1]: Entering directory '/work/code/chapter7/os/os'
rm -rf ../build/os
make[1]: Leaving directory '/work/code/chapter7/os/os'
rm -rf build
And a plain make builds everything from scratch:
$ make
make -C bootloader
make[1]: Entering directory '/work/code/chapter7/os/bootloader'
mkdir -p ../build/bootloader
nasm -f bin bootloader.asm -o ../build/bootloader/bootloader.o
make[1]: Leaving directory '/work/code/chapter7/os/bootloader'
make -C os
make[1]: Entering directory '/work/code/chapter7/os/os'
mkdir -p ../build/os
nasm -f bin sample.asm -o ../build/os/sample.o
make[1]: Leaving directory '/work/code/chapter7/os/os'
dd if=/dev/zero of=build/disk.img bs=512 count=2880 status=none
dd conv=notrunc if=build/bootloader/bootloader.o of=build/disk.img bs=512 count=1 seek=0 status=none
dd conv=notrunc if=build/os/sample.o of=build/disk.img bs=512 count=1 seek=1 status=none
The Entering directory and
Leaving directory lines are printed by the child
make processes, so that error messages, which print paths
relative to the child’s directory, can be traced back.
The last target, test, is the one chapter 0 asked you to
run as a smoke test. It builds the image, then runs the script
tools/boot-test.sh from the repository, which boots the
image in QEMU without a display, attaches gdb through the
same port 26000 mechanism we used by hand, sets a breakpoint at the
address given on the command line and reports whether the CPU reached
it. For this chapter, the address is 0x500, the milestone
of the previous section. After the build lines, make test
prints:
../../../tools/boot-test.sh build/disk.img 0x500 floppy
boot-test: ok, stopped at 0x500
qemu-system-i386: terminating on signal 15 from pid 91 (/bin/sh)
The last line is QEMU complaining that the script killed it once the
check was done, which is the intended way to end a headless run. The
continuous integration of the repository runs make test in
every chapter directory on every change, which is how the book
guarantees that the code it prints still boots. You can use it the same
way: after every change to the bootloader, make test tells
you in two seconds whether you broke the boot, before you open QEMU and
gdb to find out why.
7.7.2 GNU Make Syntax summary
GNU Make, at its core, is a domain-specific language for build automation. As with any programming language, it needs a way to define data and code. In a Makefile, variables carry data. A variable value is either hard coded or evaluated by invoking a shell such as Bash. All variable values in Make have the same type: a string of text. The number 3 is not a number, but the textual representation of the symbol 3. Here are common ways to define data in a Makefile:
Declare a variable and assign a textual value to it:
A = 1 B = 2 C = $$(expr $(A) + $(B))Ais1andBis2. The double dollar sign$$is how a Makefile writes a single$for the shell, so the value ofCas Make sees it is the text$(expr 1 + 2); nothing is computed yet. WhenCis used in a recipe, e.g.echo $(C), the shell (/bin/sh) evaluates the expression and prints3.Simple assignment with
:=:PATH = /bin PATH := $(PATH):/usr/binPATHis/bin:/usr/bin. The difference with=is when the right-hand side is expanded::=expands it immediately, which is why a variable can refer to its own previous value;=keeps the text and expands it at every use, soPATH = $(PATH):/usr/binwould be an infinite recursion and Make reports an error.Append a value at the end of a variable:
PATH = /bin PATH += /usr/binPATHis/bin /usr/bin:+=inserts a space before the appended text, so it is meant for lists of words such as source files or compiler flags, not for building a path with:.Conditional assignment:
CFLAGS ?= -O2CFLAGSis assigned the value-O2only if it was not defined already. This is useful if a user wants to supply a different value for a variable from the command line or the environment, e.g.make CFLAGS=-gto add debugging information. Otherwise, Make uses the default defined by?=.Substitution reference:
SRCS = lib1.c lib2.c main.c OBJS := $(SRCS:.c=.o)OBJShas the valuelib1.o lib2.o main.o. A part of the referenced variable is replaced with something else; in this case, every.cextension is replaced by the.oextension, thus creating the list of object filesOBJSfrom the list of source filesSRCS. It is a shorthand for thepatsubstfunction we used earlier.
Code in GNU Make is a collection of rules that it can run. Each rule is analogous to a function in a programming language, and can be called like a regular function. Each rule carries a recipe: a series of shell commands to be executed by a shell e.g. Bash. A rule has the following format:
target: prerequisites
    command
Each target is analogous to a function name. Each
prerequisite is a call to another target. Each command is
one of Make’s built-in commands or a command that is executable by a
shell. All prerequisites must be satisfied before entering the main body
of target; that is, each prerequisite must not return any
error. If any error is returned, Make terminates the whole build process
and prints an error on the command line.
Each time make runs, if no target is supplied, it starts
with the first target defined in the Makefile, goes through
every prerequisite and finally the body of that target. By convention
the first target is named all, which is why
all appears first in every Makefile of this chapter, and
all is analogous to main in other programming
languages; but it is the position that counts, not the name. However, if
make is given a target, it will start from that target
instead. This feature is useful to automate multiple aspects of a
project. For example, one target is for building the project, one target
is for generating the documents e.g. test reports, another target for
running the whole test suite and all runs every main
target.
7.7.3 Automate debugging steps with GDB script
For convenience, we save the GDB configuration to a
.gdbinit file at the project root directory. This
configuration is just a collection of GDB commands and a few extra
commands. When gdb runs, it first loads the
.gdbinit file in the home directory, then the
.gdbinit file in the current directory. Why shouldn’t we
put the commands in ~/.gdbinit? Because these commands are
specific to this project only e.g. not all programs require a remote
connection. Recent versions of gdb refuse to load a
.gdbinit from the current directory unless that directory
is declared safe; chapter 0 explains the
add-auto-load-safe-path line to add to
~/.gdbinit, and the container already has it.
Our first configuration:
.gdbinit
define hook-stop
    # Translate the segment:offset into a physical address
    printf "[%4x:%4x] ", $cs, $eip
end
hook-stop is a user-defined command with a special name:
gdb runs it every time the program stops, before printing
its own stop message. The above script displays the memory address in
[segment:offset] format, which is necessary for debugging
our bootloader and operating system code, as we saw at
0x500, where gdb alone reported
0x00000000.
It is better to use Intel syntax:
set disassembly-flavor intelThe following commands set a more convenient layout for debugging assembly code:
layout asm
layout reg
We are currently debugging bootloader code, so it is a good idea to first set it to 16-bit:
set architecture i8086Every time the QEMU virtual machine starts, gdb must
always connect to port 26000. To avoid the trouble of
manually connecting to the virtual machine, add the command:
target remote localhost:26000Debugging the bootloader needs a breakpoint at 0x7c00,
where our bootloader code starts:
b *0x7c00The complete file, in the order gdb executes it (the
layout commands come before target remote so that the
connection message already appears in the TUI):
.gdbinit
define hook-stop
    # Translate the segment:offset into a physical address
    printf "[%4x:%4x] ", $cs, $eip
end
set architecture i8086
layout asm
layout reg
set disassembly-flavor intel
target remote localhost:26000
b *0x7c00
Now, whenever gdb starts, it automatically sets the
correct architecture for the code, automatically connects to the virtual
machine 4, displays output in a convenient
layout and sets the necessary breakpoint. All that needs to be done is
to run the program. In one terminal, make qemu; in another,
make gdb (or simply gdb -q), and the command
window of the TUI shows the script at work, with the hook printing where
the CPU was stopped: [f000:fff0], the BIOS entry point.
warning: A handler for the OS ABI "GNU/Linux" is not built into this configuration
of GDB.  Attempting to continue with the default i8086 settings.

The target architecture is set to "i8086".
warning: No executable has been specified and target does not support
determining executable automatically.  Try using the "file" command.
[f000:fff0] 0x0000fff0 in ?? ()
Breakpoint 1 at 0x7c00
(gdb) c
Continuing.
[   0:7c00]
Breakpoint 1, 0x00007c00 in ?? ()
(gdb) b *0x500
Breakpoint 2 at 0x500
(gdb) c
Continuing.

Program received signal SIGTRAP, Trace/breakpoint trap.
[  50:   0] 0x00000000 in ?? ()
Chapter 8 adds two lines to this file, to load the symbols of the
kernel once it is an ELF file and to break at its main.
Keep the file in the project directory, next to the Makefile: every
chapter directory under code/ in the repository has
one.
7.8 Exercises
The exercises below modify the bootloader of section Read and load
sectors from a floppy disk, built with the Makefiles of this chapter.
Keep make test as your yardstick: run it after every
change, and when it fails, open QEMU and gdb to find out
why. Several exercises ask for the address of the instruction
after int 0x13; add -l bootloader.lst
to the nasm command in bootloader/Makefile,
and the listing file gives the offset of every instruction, to be added
to 0x7c00.
Exercise 7.2. Print before loading. Add
org 0x7c00 and the segment setup of section Two traps when
writing a bootloader to the bootloader, then, before the
int 0x13, a loop that prints msg one character
at a time with the teletype routine of the video service,
int 10h with AH = 0Eh, AL = the
character, BH = 0 and BL = 7. The message
appears on the QEMU screen under Booting from Floppy...,
and make test must still stop at 0x500. The
screen is memory too: in text mode, every character on it is a byte at
0xb8000 onward, followed by a byte for its color, so
x/16xb 0xb8000 in gdb shows the first eight
characters of the top line, and
find /b 0xb8000, +4000, 'W', 7, 'e', 7 finds your message
without a display (chapter 10 says more about this memory). Finally
remove org 0x7c00, rebuild, and explain what is printed now
with x/s $ds*16+$si at a breakpoint on the
lodsb.
Exercise 7.3. The drive number. The BIOS passes the
number of the drive it booted from in DL, and our
bootloader throws it away with mov dl, 0. Write a routine
that prints one hexadecimal digit from AL with the teletype
routine of exercise 7.2, and use it to print DL as two
digits, before DL is overwritten; a floppy boot prints
00. Then boot the same image as a hard disk: change
if=floppy to if=ide in the qemu
target of the Makefile, and floppy to hda in
the test target. The bootloader prints 80, and
make test fails: at 0x500,
x/4xb 0x500 shows zeros. Set a breakpoint after the
int 0x13 and look at AH and at the carry flag
(p/x $eax and p $eflags): the BIOS was asked
to read drive 0, a floppy that this virtual machine does
not have. Fix the bootloader by saving DL at entry and
using the saved value for the read, and check that the image now boots
both ways. Every bootloader of Part III starts with that
mov.
Exercise 7.4. Break the loader on purpose. Set
AL to 0 instead of 2 before the
int 0x13 and run make test. It passes! Explain
why, then look at what gdb shows at 0x500 with
x/4xb 0x500, and at AH and the carry flag
after the interrupt: AH = 01h is “invalid parameter”. Now
set AL to 126: AH = 09h, “DMA
boundary crossed”. The 126 sectors would end at
0x500 + 126 × 512 = 0x10100, and the floppy controller
transfers through a DMA controller that cannot cross a 64 KiB boundary
in one transfer; the BIOS refuses the whole request rather than
returning half of it. In both cases the bootloader jumps to
0x500 as if nothing had happened, since nothing checks the
result. Add a jc after the int 0x13 to an
error routine that prints a message with the routine of exercise 7.2 and
halts, so that a failed read fails make test loudly instead
of executing zeros.
Exercise 7.5. Move the stack. The bootloader never
sets SS:SP; int 0x13 pushes the flags,
CS and IP wherever the BIOS left the stack,
0000:6f08 under SeaBIOS, and iret pops them
from there. Set the stack yourself after cli, first to
0000:7c00 (it works, and it is what every later bootloader
does), then to 0000:7c40, which is inside the code of
the bootloader, then to 0000:7c46. Before running each
one, draw the six bytes the int instruction writes and
where they land, from the listing file. One of the two placements
reaches 0x500 and the other never does;
x/16xb 0x7c38 at a breakpoint after the interrupt shows
which bytes were overwritten, and the listing tells which instruction
they belonged to. Explain the difference, and state in one sentence in
which direction a stack must be kept away from.
Exercise 7.6. The largest kernel. Compute the
largest program the loader of this chapter can read with one
int 0x13, with three limits in mind: the range of
AL in the description of the service, the DMA boundary of
exercise 7.4, and the bootloader itself, which sits at
0x7c00 while the BIOS writes into the buffer that starts at
0x500. To check your answer, build a disk image where every
sector holds its own number: a shell loop around dd, or a
few lines of Python, writing 512 copies of the byte n into
sector n. Read 59 sectors, then 60. With 59,
make test passes and x/4xb 0x7af0 shows the
last sector ending just below the bootloader; with 60, gdb
never reports the breakpoint; press Ctrl-C, and
x/8xb 0x7c00 tells you what happened to the bootloader
while the BIOS was still running on its behalf. Then say where a larger
kernel has to go instead, and what the loader must do differently to put
it there. The milestone project at the end of chapter 8 asks you to do
it.
7.9 Check your understanding
The BIOS checks the bytes
0x55,0xAAat offsets 510 and 511 of the first sector. What guarantees that they are there in our file, and what would happen to a bootloader of 511 bytes of code that ends withdw 0xAA55?The string
msgis at offset 2 of the file, and the bootloader runs at0x7c00. Why doesmov si, msgload the wrong address withoutorg 0x7c00, and why do the two bootloaders printed in this chapter work without it?After
jmp 0x50:0x0,gdbprints0x00000000 in ?? ()and aSIGTRAPinstead ofBreakpoint 2. Where is the CPU really, how do you know, and what does thehook-stopof.gdbinitdo about it?gdbprints the bytesb8 50 00 8e c0as a single instructionmov eax,0xc08e0050. What are the real instructions, why doesgdbget it wrong, and what do you do when a listing looks suspicious?Why does the top-level Makefile declare
bootloaderandosas.PHONY? What wouldmakedo without that line, and why does the problem not arise forbootdisk?make qemudepends onbootdisk, andmake testas well. What mistake does this dependency prevent, and what is the cost of it?The bootloader never sets
SS:SP, yetint 0x13returns correctly. Where is the stack during the call, who chose that place, and why is relying on it a bad idea?
Many embedded devices don’t use an OS. In embedded systems, the bootloader is simply included in boot firmware and no bootloader is needed.↩︎
The following command lists all supported emulated machines from QEMU:
↩︎qemu-system-i386 -machine helpOr whatever message you want.↩︎
The QEMU virtual machine should have already been started before starting
gdb.↩︎